Sony STR-DA2100ES Operating Instructions for STRDA2100ES - Page 36
Assigning the component video input, — COMPONENT VIDEO INPUT ASSIGN
 |
View all Sony STR-DA2100ES manuals
Add to My Manuals
Save this manual to your list of manuals |
Page 36 highlights
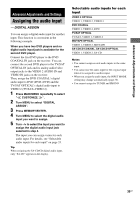
Assigning the component video input - COMPONENT VIDEO INPUT ASSIGN You can assign a component video input for another visual input. 1 Press MAIN MENU repeatedly to select " CUSTOMIZE ". 2 Turn MENU to select "COMPO V. ASSIGN". 3 Press MEMORY/ENTER. 4 Turn MENU to select the component video input you want to assign. 5 Turn -/+ to select the input you want to assign the component video input jacks selected in step 4. The input you can assign varies for each component video input. For details, see "Selectable component video inputs for each input" on page 36. Selectable component video inputs for each input DVD VIDEO 1, VIDEO 2, VIDEO 3, DVD TV/SAT VIDEO 1, VIDEO 2, VIDEO 3, TV/SAT Note You cannot assign a visual input to more than one component video input. Switching the audio input mode for digital components - INPUT MODE You can switch the audio input mode for components which have digital audio input jacks. 1 Turn INPUT SELECTOR to select the input. 2 Press INPUT MODE repeatedly to select the audio input mode. The selected audio input mode appears in the display. Audio input modes • AUTO 2CH Gives priority to digital signals when there are both digital and analog connections. If there are no digital signals, analog is selected. • COAX FIXED Specifies the digital audio signals input to the DIGITAL COAXIAL input jack. • OPT FIXED Specifies the digital audio signals input to the DIGITAL OPTICAL input jacks. • ANALOG FIXED Specifies the analog audio signals input to the AUDIO IN (L/R) jacks. Notes • When signals with a sampling frequency of more than 48 kHz is input, the equalizer and sound field cannot be used. • You cannot select the digital audio input which is assigned to another function by DIGITAL ASSIGN function (page 35). • Some of the audio input modes may be dimmed depending on the input. This means that the selected input is unavailable. 36US
-
 1
1 -
2
-
3
-
4
-
5
-
6
-
7
-
8
-
9
-
10
-
11
-
12
-
13
-
14
-
15
-
16
-
17
-
18
-
19
-
20
-
21
-
22
-
23
-
24
-
25
-
26
-
27
-
28
-
29
-
30
-
 31
31 -
 32
32 -
 33
33 -
 34
34 -
 35
35 -
 36
36 -
 37
37 -
 38
38 -
 39
39 -
 40
40 -
 41
41 -
42
-
43
-
44
-
45
-
46
-
47
-
48
-
49
-
50
-
51
-
52
-
53
-
54
-
55
-
56
-
57
-
58
-
59
-
60
-
61
-
62
-
63
-
64
-
65
-
66
-
67
-
68
 |
 |
