Sony STR-DA2100ES Operating Instructions for STRDA2100ES - Page 54
Selecting the command mode of the remote, Programming the remote, Hold down RM SET UP and press
 |
View all Sony STR-DA2100ES manuals
Add to My Manuals
Save this manual to your list of manuals |
Page 54 highlights
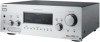
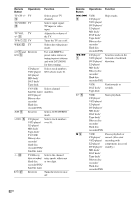
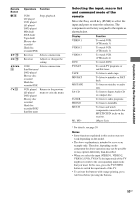
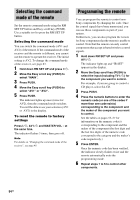
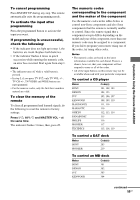
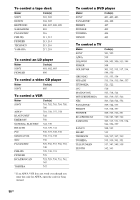
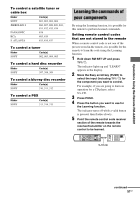
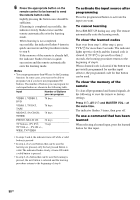
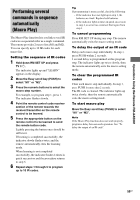
Selecting the command mode of the remote Set the remote command mode using the RM SET UP button and Easy scroll key (PUSH). Use a suitable tool to press the RM SET UP button. Selecting the command mode You can switch the command mode (AV1 and AV2) of the remote. If the command mode of the receiver and the remote is different, you cannot use the remote to operate the receiver. The initial setting is AV2. To change the command mode of the receiver, see page 63. 1 Hold down RM SET UP and press ?/1. 2 Move the Easy scroll key (PUSH) to select "MAIN". 3 Press PUSH. 4 Move the Easy scroll key (PUSH) to select "AV1" or "AV2". 5 Press PUSH. The indicator lights up once (twice for AV2), then the command mode switches. You will be able to see your selection (AV1 or AV2) in the display. To reset the remote to factory settings Press ?/1, AV ?/1 and MASTER VOL - at the same time. The indicator flashes 3 times, then goes off. Note For details on "Changing the command mode of the receiver", see page 45. Programming the remote You can program the remote to control nonSony components by changing the code. Once the control signals have been memorized, you can use those components as part of your system. Furthermore, you can also program the remote for Sony components that the remote is unable to control. Note that the remote can only control components that accept infrared wireless control signals. 1 Hold down RM SET UP and press AV ?/1. The indicator lights up and "IR SET" appears in the display. 2 Move the Easy scroll key (PUSH) to select the input (including TV ?/1) for the component you want to control. For example, if you are going to control a CD player, select SA-CD. 3 Press PUSH. 4 Press the numeric buttons to enter the numeric code (or one of the codes if more than one code exists) corresponding to the component and the maker of the component you want to control. See the tables on pages 55-57 for information on the numeric code(s) corresponding to the component and the maker of the component (the first digit and the last two digits of the numeric code correspond to the category and the maker's code respectively.) 5 Press ENTER. Once the numeric code has been verified, the indicator slowly flashes twice and the remote automatically exits the programming mode. 6 Repeat steps 1 to 5 to control other components. 54US
-
 1
1 -
2
-
3
-
4
-
5
-
6
-
7
-
8
-
9
-
10
-
11
-
12
-
13
-
14
-
15
-
16
-
17
-
18
-
19
-
20
-
21
-
22
-
23
-
24
-
25
-
26
-
27
-
28
-
29
-
30
-
31
-
32
-
33
-
34
-
35
-
36
-
37
-
38
-
39
-
40
-
41
-
42
-
43
-
44
-
45
-
46
-
47
-
48
-
 49
49 -
 50
50 -
 51
51 -
 52
52 -
 53
53 -
 54
54 -
 55
55 -
 56
56 -
 57
57 -
 58
58 -
 59
59 -
60
-
61
-
62
-
63
-
64
-
65
-
66
-
67
-
68
 |
 |