TEAC AD-500 Owners Manual - Page 13
Copying from CD to Tape - cd cassette player
 |
View all TEAC AD-500 manuals
Add to My Manuals
Save this manual to your list of manuals |
Page 13 highlights
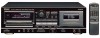
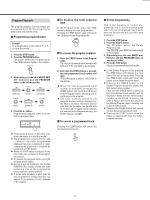
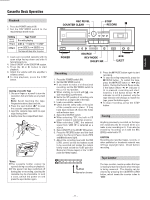
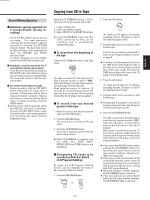
ENGLISH Record Muting Operation ∑ Automatic spacing operation for 4-second blanks (during recording) Press the REC MUTE button during recording. The tape movement continues and a blank space of about 4 seconds is recorded (the RECORD indicator blinks). The deck then enters the Record-Pause mode automatically (both the RECORD and PAUSE indicators light). To restart recording, press the PAUSE button (the PAUSE indicator goes off). ∑ Automatic spacing operation for 4second blanks (during record-pause) In the Record-Pause mode, pressing the REC MUTE button will initiate the above record-muting operation automatically. The deck then returns to the RecordPause mode. ∑ For a blank of more than 4 seconds During recording, hold the REC MUTE button depressed for longer than 4 seconds. A blank space will be left as long as the button is pressed. Release the button to enter the Record-Pause mode. To restart recording, press the PAUSE button. O During record muting operation (while the RECORD indicator is blinking), pressing the REC MUTE button again will release the record muting operation and recording will restart without stopping the tape. Copying from CD to Tape Using the CD DUBBING function, a CD-totape copy can be done easily and simply. 1. Load a compact disc. 2. Load a recordable cassette. 3. Select ON/OFF of the DOLBY NR system. O In the CD DUBBING mode, the REC LEVEL control has no effect, as the recording level is automatically adjusted internally. ∑ To record from the beginning of the tape Press the CD DUBBING button in the Stop mode. The tape is rewound to the beginning of Side A and the counter is reset to "0000", while the CD player is in the Pause mode at the beginning of the first CD track. After mute-recording for approx. 10 seconds (to avoid the leader tape), the cassette deck drops into the Recording mode while the CD player starts playback. ∑ To record from any desired position of the tape 1. Move the tape to the desired position and press the STOP button. 2. Press the RECORD button. The deck enters the Record-Pause mode. 3. Press the CD DUBBING button. CD-to-tape copying starts from the current tape position. O While CD DUBBING is engaged, only the STOP (CD), STOP (TAPE), OPEN/CLOSE and TIME buttons are operational. ∑ Designating CD tracks to be recorded on Side A or Side B (A-B Program Dubbing) By using the A-B Program Dubbing function, you can designate CD tracks to be recorded on Side A or Side B. 1. Press the PROGRAM button. or 2. Press the A-B button. "A-" blinks and "B" lights in the display, indicating that the CD player is now in the "Side A program" mode. 3. Program tracks to be recorded on Side A of the tape. Perform the procedures described in step 3 in the "Program Playback" section on page 8. O To display the total program time, press the TIME button in the Program mode. It will help you to fit the total recording time to the tape length. Pressing the TIME button again will return the CD player to the Program mode. 4. Press the A-B button. "A-" lights and "B" blinks in the display, indicating that the CD player is now in the "Side B program" mode. 5. Program tracks to be recorded on Side B of the tape. O Pressing the A-B button in the Side B Program mode will return the CD player to the Side A Program mode. 6. Press the CD DUBBING button. The tape is rewound to the beginning of side A and the counter is reset to "0000", while the CD player is in the Pause mode at the first track of the Side A program. After mute-recording for approx. 10 seconds (to avoid the leader tape), the cassette deck drops into the Recording mode while the CD player starts the program playback. O If you press the RECORD button before pressing the CD DUBBING button, the recording will start from the current tape position (without rewinding the tape to the beginning). O If the tape on Side A ends before 01:30 (1 minute 30 seconds) of the current CD track has been played, the recording of Side B will start with that track. (except with A-B Program Dubbing) O When the CD player finishes playback, the CD DUBBING mode is released. O If the tape comes to the end of Side B before the CD player finishes playback, the CD DUBBING mode is canceled. _ 13 _
-
 1
1 -
2
-
3
-
4
-
5
-
6
-
7
-
 8
8 -
 9
9 -
 10
10 -
 11
11 -
 12
12 -
 13
13 -
 14
14 -
 15
15 -
 16
16 -
 17
17 -
 18
18 -
19
-
20
-
21
-
22
-
23
-
24
-
25
-
26
-
27
-
28
-
29
-
30
-
31
-
32
-
33
-
34
-
35
-
36
-
37
-
38
-
39
-
40
-
41
-
42
-
43
-
44
-
45
-
46
-
47
-
48
-
49
-
50
-
51
-
52
-
53
-
54
-
55
-
56
-
57
-
58
-
59
-
60
-
61
-
62
-
63
-
64
-
65
-
66
-
67
-
68
-
69
-
70
-
71
-
72
-
73
-
74
-
75
-
76
-
77
-
78
-
79
-
80
-
81
-
82
-
83
-
84
 |
 |