TEAC AD-500 Owners Manual - Page 14
Timer-controlled operation, Continuous Playback, between CD and Tape - cassette player
 |
View all TEAC AD-500 manuals
Add to My Manuals
Save this manual to your list of manuals |
Page 14 highlights
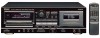
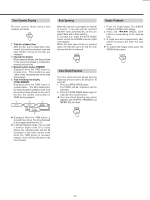
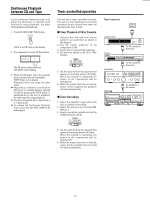
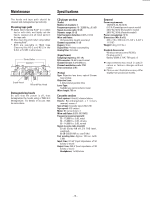
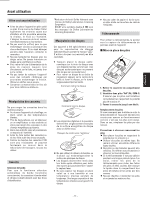
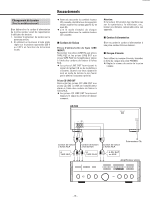
Continuous Playback between CD and Tape In the Continuous Playback mode, once either the CD player or cassette deck finishes (or stops) playback, the other starts playback automatically. 1. Press CD-TAPE CONT PLAY button. "TAPE" and "CD" blink in the display. 2. (For example) Press the CD Play button. The CD player starts playback. "CD" blinks in the display. 3. When the CD player stops, the cassette deck automatically starts playback. "TAPE" blinks in the display. Afterward, when one stops, the other starts. O Regardless of whether one machine (CD player or cassette deck) is stopped forcibly by pressing the STOP button or automatically at the end of playback, the other machine starts playback. O You may change the CD or tape while it is in Stop mode. O To release the Continuous Playback mode, press the CD-TAPE CONT PLAY button again. Timer-controlled operation The unit has a timer controlled function. This lets you start playback or recording operations at any desired time when an optional audio timer is used. ∑ Timer Playback of CD or Cassette 1. Connect the unit and your stereo system to an audio timer as shown in the diagram. 2. Set the power switches of all components to ON. 3. Load a disc or a prerecorded cassette. 4. Set the timer switch to the CD or TAPE position. 5. Set the audio timer to the required start (power on) and stop (power off) times. When this setting is completed, the power to all components will be switched off. 6. When the preset start time is reached, power will be supplied and playback will start automatically. ∑ Timer Recording 1. Select the amplifier's input which this deck is capable of recording. 2. Select the source to be recorded (FM, AM, etc.). 3. Load a recordable cassette and set the [TIMER] switch to [REC]. Timer Connection Audio timer Tuner Amplifier To AC outlet of the timer To AC outlet of the tuner AD-500 To amplifier's AC outlet 4. Set the audio timer to the required start (power on) and stop (power off) times. When this setting is completed, the power to all components will be switched off. 5. When the preset start time is reached, power will be supplied and recording will start automatically. _ 14 _
-
 1
1 -
2
-
3
-
4
-
5
-
6
-
7
-
8
-
 9
9 -
 10
10 -
 11
11 -
 12
12 -
 13
13 -
 14
14 -
 15
15 -
 16
16 -
 17
17 -
 18
18 -
 19
19 -
20
-
21
-
22
-
23
-
24
-
25
-
26
-
27
-
28
-
29
-
30
-
31
-
32
-
33
-
34
-
35
-
36
-
37
-
38
-
39
-
40
-
41
-
42
-
43
-
44
-
45
-
46
-
47
-
48
-
49
-
50
-
51
-
52
-
53
-
54
-
55
-
56
-
57
-
58
-
59
-
60
-
61
-
62
-
63
-
64
-
65
-
66
-
67
-
68
-
69
-
70
-
71
-
72
-
73
-
74
-
75
-
76
-
77
-
78
-
79
-
80
-
81
-
82
-
83
-
84
 |
 |