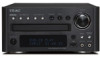
TEAC DR-H338i Manual for DR-H338i - Page 11
Connection to a TV, Power cord receptacle, AUX 1/LINE OUT jacks, iPod port - dvd
 |
View all TEAC DR-H338i manuals
Add to My Manuals
Save this manual to your list of manuals |
Page 11 highlights
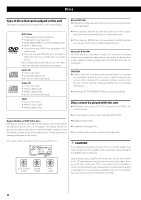
Connection to Audio Equipments etc. After all connections are complete, connect the power cord's plug to the AC wall socket. < Read the instructions of each component you intend to use with this unit. < Be sure to connect each plug securely. To prevent hum and noise, do not bundle the connection cords. B A C D ENGLISH Optical digital cable RCA cable Wall socket Cassette tape deck etc. Digital audio device (CD recorder, MD deck, etc.) A Power cord receptacle After all other connections have been made, insert the supplied AC power cord into this receptacle, then connect the other end of the power cord into the wall socket. Ensure that your AC voltage corresponds to the voltage marked on the rear panel of the unit. Consult a qualified electrician if you are in doubt. In order to avoid the risk of electric shock, fire, and so on, only use the supplied power cord. < If you are not going to use the unit for some time, disconnect the power cord from the wall socket. C iPod port Connect the iPod dock to this port. D Digital audio output terminal Digital audio from DVD-Video, CD and video CD is output from this terminal. Connect an amplifiers including a decoder, or digital audio devices such as CD recorders, etc. to this jack using commerciallyavailable optical digital audio cable (TOS). < Select "ALL" or "PCM only" in the DIGITAL AUDIO SETUP (page 39). B AUX 1/LINE OUT jacks Analog 2-channel audio signal is input or output from these jacks. Connect a cassette tape deck etc. to these jacks using commercially-available RCA cables. Make sure to connect: White plug e White jack (L: left channel) Red plug e Red jack (R: right channel) 11
-
 1
1 -
2
-
3
-
4
-
5
-
 6
6 -
 7
7 -
 8
8 -
 9
9 -
 10
10 -
 11
11 -
 12
12 -
 13
13 -
 14
14 -
 15
15 -
 16
16 -
17
-
18
-
19
-
20
-
21
-
22
-
23
-
24
-
25
-
26
-
27
-
28
-
29
-
30
-
31
-
32
-
33
-
34
-
35
-
36
-
37
-
38
-
39
-
40
-
41
-
42
-
43
-
44
-
45
-
46
-
47
-
48
-
49
-
50
-
51
-
52
-
53
-
54
-
55
-
56
-
57
-
58
-
59
-
60
-
61
-
62
-
63
-
64
-
65
-
66
-
67
-
68
-
69
-
70
-
71
-
72
-
73
-
74
-
75
-
76
-
77
-
78
-
79
-
80
-
81
-
82
-
83
-
84
-
85
-
86
-
87
-
88
-
89
-
90
-
91
-
92
-
93
-
94
-
95
-
96
-
97
-
98
-
99
-
100
-
101
-
102
-
103
-
104
-
105
-
106
-
107
-
108
-
109
-
110
-
111
-
112
-
113
-
114
-
115
-
116
-
117
-
118
-
119
-
120
-
121
-
122
-
123
-
124
-
125
-
126
-
127
-
128
-
129
-
130
-
131
-
132
-
133
-
134
-
135
-
136
-
137
-
138
-
139
-
140
-
141
-
142
-
143
-
144
-
145
-
146
-
147
-
148
 |
 |
