TEAC DR-H338i Manual for DR-H338i - Page 15
Identifying the Parts (Remote Control Unit), Play/Pause - receiver
 |
View all TEAC DR-H338i manuals
Add to My Manuals
Save this manual to your list of manuals |
Page 15 highlights
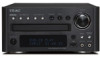
ENGLISH A SOURCE Use this button to select a source. B Search (m/,)/PRESET In FM or AM mode, use these buttons to select a preset channel. In DISC, USB or iPod mode, use these buttons to search for a part of a track/file/song. C Skip (.//)/TUNING In FM or AM mode, use these buttons to tune in a station. In DISC, USB or iPod mode, use these buttons to skip tracks/files/ songs. D Play/Pause (G/J)/FM MODE In FM mode, use this button to select stereo or monaural. In DISC, USB or iPod mode, use this button to start or pause playback. I PHONES To listen with headphones, first lower the volume level to the minimum. Then, connect the headphones plug into the PHONES jack, and adjust the volume by turning the VOLUME knob. The speakers will make no sound when headphones are plugged in. CAUTION Do not connect headphones with the PHONES jack while wearing them. Moreover, do not disconnect headphones or turn the unit on or off while wearing them. Very loud sound could be output from the headphones. AVOID DAMAGING YOUR HEARING - Do not put on headphones until after plugging them in. J REPEAT In DISC, USB or iPod mode, use this button for repeat playback. K AUX 2 IN You can connect a portable audio player to this jack. E Stop ( H)/SCAN In FM or AM mode, use this button to preset stations automatically. In DISC or USB mode, use this button to stop playback. F Open/Close (L) Use this button to open and close the disc tray. When the tray is opened during playback, it may take a few seconds before the disc is "unloaded" and the tray opens. G VOLUME Turn this knob to adjust the volume level. H PROGRAM/MEMORY In FM or AM mode, use this button to preset stations. In DISC or USB mode, use this button to programme tracks. L Remote control sensor Receives signals from the remote control unit. Point the remote control unit at this sensor when operating the remote control unit. M USB connector You can connect an USB memory device to this connector. N Display O Disc tray P STANDBY/ON Use this button to turn the unit on and standby. The indicator lights blue when the unit is turned on. The indicator lights orange when the unit is in the standby mode. 15
-
 1
1 -
2
-
3
-
4
-
5
-
6
-
7
-
8
-
9
-
 10
10 -
 11
11 -
 12
12 -
 13
13 -
 14
14 -
 15
15 -
 16
16 -
 17
17 -
 18
18 -
 19
19 -
 20
20 -
21
-
22
-
23
-
24
-
25
-
26
-
27
-
28
-
29
-
30
-
31
-
32
-
33
-
34
-
35
-
36
-
37
-
38
-
39
-
40
-
41
-
42
-
43
-
44
-
45
-
46
-
47
-
48
-
49
-
50
-
51
-
52
-
53
-
54
-
55
-
56
-
57
-
58
-
59
-
60
-
61
-
62
-
63
-
64
-
65
-
66
-
67
-
68
-
69
-
70
-
71
-
72
-
73
-
74
-
75
-
76
-
77
-
78
-
79
-
80
-
81
-
82
-
83
-
84
-
85
-
86
-
87
-
88
-
89
-
90
-
91
-
92
-
93
-
94
-
95
-
96
-
97
-
98
-
99
-
100
-
101
-
102
-
103
-
104
-
105
-
106
-
107
-
108
-
109
-
110
-
111
-
112
-
113
-
114
-
115
-
116
-
117
-
118
-
119
-
120
-
121
-
122
-
123
-
124
-
125
-
126
-
127
-
128
-
129
-
130
-
131
-
132
-
133
-
134
-
135
-
136
-
137
-
138
-
139
-
140
-
141
-
142
-
143
-
144
-
145
-
146
-
147
-
148
 |
 |
