Toshiba D-R410 Owner's Manual - English - Page 54
Marker Setting
 |
UPC - 022265001356
View all Toshiba D-R410 manuals
Add to My Manuals
Save this manual to your list of manuals |
Page 54 highlights
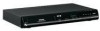
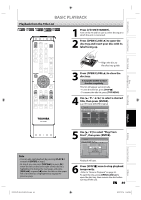
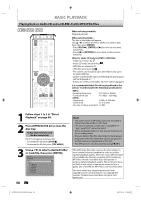
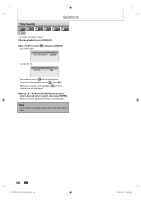
Zoom SPECIAL PLAYBACK Marker Setting 1) During playback, press [DISPLAY] or [ZOOM]. • If you press [ZOOM], skip to step3. This feature allows you to assign a specific point on a disc to be called back later. 2) Use [{ / B] to select , then press [ENTER] within 1 second, or wait for 1 second to display the selection menu. e.g.) DVD-video 1/ 5 1/ 5 0:01:00 / 1:23:45 DVD Video • For audio CD, skip to step 2. 1) During playback, press [DISPLAY]. 2) Use [{ / B] to select , then press [ENTER] within 1 second, or wait for 1 second to display the marker list. e.g.) DVD-video 3) Use [K / L] to select a desired zoom factor to zoom, then press [ENTER]. 1/ 5 1/ 5 0:01:00 / 1:23:45 DVD Video × 1.2 × 1.5 × 2.0 Zoom menu will appear. There are four options (x1.0, x1.2, x1.5 and x2.0), these are displayed excluding the current zoom rate. 1/ 5 1/ 5 0:01:00 / 1:23:45 DVD Video 3) Use [K / L] to select a desired marker number. When it reaches the desired point, press [ENTER]. 1/ 5 1/ 5 1 --2 --3 --4 --5 --6 --- 0:01:00 / 1:23:45 DVD Video Zoom area will be displayed. 4) Use [K / L / { / B] to select a desired zoom position, then press [ENTER]. Zoom playback will start. Note • When selecting a smaller factor than the current one, the zoom area will not be displayed. • To exit the zoom menu, press [DISPLAY] repeatedly. • To cancel the zoom function, select "x1.0" using [K / L], then press [ENTER] at step 3. • You cannot slide the zoomed picture on some JPEG files. The title (track) number and the time will be displayed. 4) To return to the marker: Use [K / L] to select the desired marker number, then press [ENTER]. Note • To clear a marker, select the marker number to be cleared, then press [CLEAR]. • All markers will be erased when you operate these operations listed below. - Opening the disc tray - Turning off the power - Recording on a recordable disc • You can mark up to 6 points. 54 EN E7K7AUD_D-R410KU_EN.indd 54 2007/12/14 15:03:29
-
 1
1 -
2
-
3
-
4
-
5
-
6
-
7
-
8
-
9
-
10
-
11
-
12
-
13
-
14
-
15
-
16
-
17
-
18
-
19
-
20
-
21
-
22
-
23
-
24
-
25
-
26
-
27
-
28
-
29
-
30
-
31
-
32
-
33
-
34
-
35
-
36
-
37
-
38
-
39
-
40
-
41
-
42
-
43
-
44
-
45
-
46
-
47
-
48
-
 49
49 -
 50
50 -
 51
51 -
 52
52 -
 53
53 -
 54
54 -
 55
55 -
 56
56 -
 57
57 -
 58
58 -
 59
59 -
60
-
61
-
62
-
63
-
64
-
65
-
66
-
67
-
68
-
69
-
70
-
71
-
72
-
73
-
74
-
75
-
76
-
77
-
78
-
79
-
80
-
81
-
82
-
83
-
84
-
85
-
86
-
87
-
88
-
89
-
90
-
91
-
92
-
93
-
94
-
95
-
96
-
97
-
98
-
99
-
100
-
101
 |
 |