Toshiba Portege R500 User Manual - Page 35
Display hinges, Display screen, Touch Pad, Touch Pad control, buttons, Microphone, Keyboard, Speaker
 |
View all Toshiba Portege R500 manuals
Add to My Manuals
Save this manual to your list of manuals |
Page 35 highlights
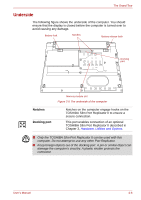
The Grand Tour Display hinges Display screen Touch Pad Touch Pad control buttons Microphone Keyboard Speaker Power button TOSHIBA Assist button The display hinges allow the display panel to be position at a variety of easy-to-view angles. Please be aware that, when the computer is operating on the AC adaptor, the image displayed on the internal screen will be somewhat brighter than when it operates on battery power. This difference in brightness levels is intended to save power when operating on batteries. For more information on the computer's display, please refer to the Display Controller and Video mode section in Appendix B. The Touch Pad mouse control device located in the center of the palm rest is used to control the movement of the on-screen pointer. For more information, please refer to the Using the Touch Pad section in Chapter 4, Operating Basics. The control buttons located below the Touch Pad allow you to select menu items or manipulate text and graphics as designated by the on-screen pointer. A built-in microphone allows you to import and record sounds for your application - please refer to the Sound System section in Chapter 4, Operating Basics for more information. The internal keyboard provides the embedded numeric overlay keys, dedicated cursor control overlay keys, and Keys. The keyboard is compatible with the IBM® enhanced keyboard. Refer to Chapter 5, The Keyboard, for details. The internal monaural speaker emits sound generated by your software as well as audio alarms, generated by the system. Press this button to turn the computer's power on and off. Press this button to launch the program automatically. When power-off, Sleep Mode and Hibernation Mode, press this button to start the computer and launch the program. User's Manual 2-8
-
 1
1 -
2
-
3
-
4
-
5
-
6
-
7
-
8
-
9
-
10
-
11
-
12
-
13
-
14
-
15
-
16
-
17
-
18
-
19
-
20
-
21
-
22
-
23
-
24
-
25
-
26
-
27
-
28
-
29
-
 30
30 -
 31
31 -
 32
32 -
 33
33 -
 34
34 -
 35
35 -
 36
36 -
 37
37 -
 38
38 -
 39
39 -
 40
40 -
41
-
42
-
43
-
44
-
45
-
46
-
47
-
48
-
49
-
50
-
51
-
52
-
53
-
54
-
55
-
56
-
57
-
58
-
59
-
60
-
61
-
62
-
63
-
64
-
65
-
66
-
67
-
68
-
69
-
70
-
71
-
72
-
73
-
74
-
75
-
76
-
77
-
78
-
79
-
80
-
81
-
82
-
83
-
84
-
85
-
86
-
87
-
88
-
89
-
90
-
91
-
92
-
93
-
94
-
95
-
96
-
97
-
98
-
99
-
100
-
101
-
102
-
103
-
104
-
105
-
106
-
107
-
108
-
109
-
110
-
111
-
112
-
113
-
114
-
115
-
116
-
117
-
118
-
119
-
120
-
121
-
122
-
123
-
124
-
125
-
126
-
127
-
128
-
129
-
130
-
131
-
132
-
133
-
134
-
135
-
136
-
137
-
138
-
139
-
140
-
141
-
142
-
143
-
144
-
145
-
146
-
147
-
148
-
149
-
150
-
151
-
152
-
153
-
154
-
155
-
156
-
157
-
158
-
159
-
160
-
161
-
162
-
163
-
164
-
165
-
166
-
167
-
168
-
169
-
170
-
171
-
172
-
173
-
174
-
175
-
176
-
177
-
178
-
179
-
180
-
181
-
182
-
183
-
184
-
185
-
186
-
187
-
188
-
189
-
190
-
191
-
192
-
193
-
194
-
195
-
196
-
197
-
198
 |
 |
