Uniden BC250D English Owners Manual - Page 40
Searching
 |
View all Uniden BC250D manuals
Add to My Manuals
Save this manual to your list of manuals |
Page 40 highlights
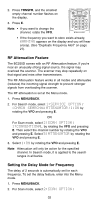
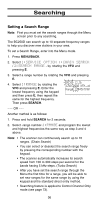
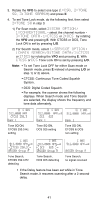
Searching Setting a Search Range Note: First you must set the search ranges through the Menu screen prior to any searching. The BC250D can search up to 10 separate frequency ranges to help you discover new stations in your area. To set a Search Range, enter into the Menu mode. 1. Press MENU/BACK. 2. Select 1:SERVICE OPTION / :CHAIN SEARCH / 2:SEARCH RANGE - by rotating the VFO and pressing E. 3. Select a range number by rotating the VFO and pressing E. 4. Select 1:RANGE by rotating the VFO and pressing E. Enter the lowest frequency using the keypad SRCH 12.5k 1240.0000 NFM Range 1234567890 and then press E, then repeat the same for the highest frequency. Then press SEARCH. --- OR --- Another method is as follows: 1. Press and hold SEARCH for 2 seconds. 2. Select -range number-1:RANGE and program the lowest and highest frequencies the same way as step 3 and 4 above. Note: • The scanner can continuously search up to 10 ranges. (Chain Search) • You can select or deselect the search range freely by pressing the corresponding number with the keypad. • The scanner automatically increases its search speed from 100 to 300 steps per second for the bands having 5 kHz steps. (Turbo Search) • After you have set the search range through the Menu the first time for a range, you will be able to set new ranges for the same range by using the keypad and the standard direct entry method. • Searching feature is applied to Control Channel Only mode (see page 73). 36
-
 1
1 -
2
-
3
-
4
-
5
-
6
-
7
-
8
-
9
-
10
-
11
-
12
-
13
-
14
-
15
-
16
-
17
-
18
-
19
-
20
-
21
-
22
-
23
-
24
-
25
-
26
-
27
-
28
-
29
-
30
-
31
-
32
-
33
-
34
-
 35
35 -
 36
36 -
 37
37 -
 38
38 -
 39
39 -
 40
40 -
 41
41 -
 42
42 -
 43
43 -
 44
44 -
 45
45 -
46
-
47
-
48
-
49
-
50
-
51
-
52
-
53
-
54
-
55
-
56
-
57
-
58
-
59
-
60
-
61
-
62
-
63
-
64
-
65
-
66
-
67
-
68
-
69
-
70
-
71
-
72
-
73
-
74
-
75
-
76
-
77
-
78
-
79
-
80
-
81
-
82
-
83
-
84
-
85
-
86
-
87
-
88
-
89
-
90
-
91
-
92
-
93
-
94
-
95
-
96
-
97
-
98
-
99
-
100
-
101
-
102
-
103
-
104
-
105
-
106
-
107
-
108
-
109
-
110
 |
 |