Uniden BC250D English Owners Manual - Page 53
Programming and, Receiving, Digital and Trunked, Systems
 |
View all Uniden BC250D manuals
Add to My Manuals
Save this manual to your list of manuals |
Page 53 highlights
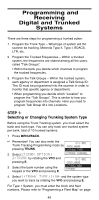
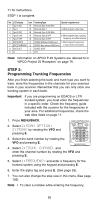
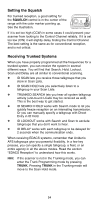
Programming and Receiving Digital and Trunked Systems There are three steps for programming a trunked sytem: 1. Program the Trunk Type - What type of system will the scanner be tracking, Motorola Type II, Type I, EDACS, LTR, etc. 2. Program the Trunked Frequencies - Within a trunked system, the frequencies are shared among all the users, called "Talk Groups". • Within the bank you decide which channels to program the trunked frequencies. 3. Program the Talk Groups - Within the trunked system, each agency or department is assigned a Talk Group ID. This ID must be programmed into the scanner in order to monitor that specific agency or department. • When programming you decide which "Location" to program the "Talk Groups". This is similar to how you program frequencies into channels. Here you need to program Talk Group ID's into Locations. STEP 1: Selecting or Changing Trunking System Type Before using the Trunk Tracking system, you must select the bank and trunk type. You can only track one trunked system per bank, total of 10 trunked systems. 1 Press MENU/BACK. Remember! You can also enter the Trunk Tracking Programming mode by C 001 OOOO.0000 pressing TRUNK. 1:TRUNK TYPE 2. Select 2:SCAN OPTION / 2:TRUNK CHANNEL 2:TRUNK by rotating the VFO and pressing E. 3 Select the bank number using the keypad or the VFO and pressing E. C 001 OOOO.0000 1:TYPE2 800 2:TYPE1 4. Select 1:TRUNK TYPE / 1:ON- and the system type you want to track by rotating the VFO and pressing E. For Type 1 System, you must enter the block and fleet numbers. Please refer to "Programming a Fleet Map" on page 49
-
 1
1 -
2
-
3
-
4
-
5
-
6
-
7
-
8
-
9
-
10
-
11
-
12
-
13
-
14
-
15
-
16
-
17
-
18
-
19
-
20
-
21
-
22
-
23
-
24
-
25
-
26
-
27
-
28
-
29
-
30
-
31
-
32
-
33
-
34
-
35
-
36
-
37
-
38
-
39
-
40
-
41
-
42
-
43
-
44
-
45
-
46
-
47
-
 48
48 -
 49
49 -
 50
50 -
 51
51 -
 52
52 -
 53
53 -
 54
54 -
 55
55 -
 56
56 -
 57
57 -
 58
58 -
59
-
60
-
61
-
62
-
63
-
64
-
65
-
66
-
67
-
68
-
69
-
70
-
71
-
72
-
73
-
74
-
75
-
76
-
77
-
78
-
79
-
80
-
81
-
82
-
83
-
84
-
85
-
86
-
87
-
88
-
89
-
90
-
91
-
92
-
93
-
94
-
95
-
96
-
97
-
98
-
99
-
100
-
101
-
102
-
103
-
104
-
105
-
106
-
107
-
108
-
109
-
110
 |
 |
