Whirlpool WFC8090GX Installation Instructions - Page 30
Level Washer/Dryer
 |
View all Whirlpool WFC8090GX manuals
Add to My Manuals
Save this manual to your list of manuals |
Page 30 highlights
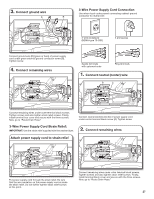
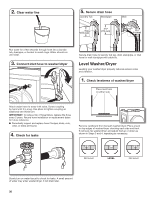
2. Clear water line 5. Secure drain hose Laundry Tub Standpipe Wall 4.451"/2" (114 mm) 41/2" (114 mm) 41./52" (1143 mm) Run water for a few seconds through hose into a laundry tub, drainpipe, or bucket to avoid clogs. Water should run until clear. 3. Connect inlet hose to washer/dryer Secure drain hose to laundry tub leg, drain standpipe, or inlet hose for wall standpipe with cable tie. Level Washer/Dryer Leveling your washer/dryer properly reduces excess noise and vibration. 1. Check levelness of washer/dryer Place level here on either side Attach water hose to water inlet valve. Screw coupling by hand until it is snug. Use pliers to tighten coupling an additional two-thirds turn. IMPORTANT: To reduce risk of hose failure, replace the hose every 5 years. Record hose installation or replacement dates for future reference. n Periodically inspect and replace hose if bulges, kinks, cuts, wear, or leaks are found. 4. Check for leaks Remove cardboard from beneath washer/dryer. Place a level on top edges of washer/dryer, checking each side and front. If not level, tip washer/dryer and adjust feet up or down as shown in Steps 3 and 4, repeating as necessary. Not Level LEVEL Not Level Slowly turn on water faucet to check for leaks. A small amount of water may enter washer/dryer. It will drain later. 30
-
 1
1 -
2
-
3
-
4
-
5
-
6
-
7
-
8
-
9
-
10
-
11
-
12
-
13
-
14
-
15
-
16
-
17
-
18
-
19
-
20
-
21
-
22
-
23
-
24
-
 25
25 -
 26
26 -
 27
27 -
 28
28 -
 29
29 -
 30
30 -
 31
31 -
 32
32 -
 33
33 -
 34
34 -
 35
35 -
36
-
37
-
38
-
39
-
40
-
41
-
42
-
43
-
44
-
45
-
46
-
47
-
48
-
49
-
50
-
51
-
52
-
53
-
54
-
55
-
56
-
57
-
58
-
59
-
60
-
61
-
62
-
63
-
64
-
65
-
66
-
67
-
68
-
69
-
70
-
71
-
72
-
73
-
74
-
75
-
76
-
77
-
78
-
79
-
80
-
81
-
82
-
83
-
84
-
85
-
86
-
87
-
88
-
89
-
90
-
91
-
92
 |
 |
