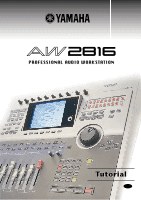
Yamaha AW2816 Tutorial
Yamaha AW2816 Manual
 |
View all Yamaha AW2816 manuals
Add to My Manuals
Save this manual to your list of manuals |
Yamaha AW2816 manual content summary:
- Yamaha AW2816 | Tutorial - Page 1
PROFESSIONAL AUDIO WORKSTATION Tutorial E - Yamaha AW2816 | Tutorial - Page 2
digital recording), the AW2816 includes an automix function that records and reproduces the operations of the mixer section, two digital multi-effect units with a rich array of functions, a completely uncompressed 16-track recorder that supports not only 16 bit CD-quality but also 24 bit recording - Yamaha AW2816 | Tutorial - Page 3
1 About this tutorial 1 Contents 2 Recording on the AW2816 3 Creating a new song 3 Recording the rhythm section 3 Using two mics to record the rhythm 3 Connect the mics to the AW2816 3 Recording sound from the mics onto the hard disk 4 Play back the recorded sound 4 Recording the sound of - Yamaha AW2816 | Tutorial - Page 4
mixing consoles found in large recording studios. Although you can of course record a live performance in a single pass, you can also use multi-track recording to take full advantage of the AW2816's 16 x 8 = 128 tracks. This tutorial will guide you through the actual recording process, so that you - Yamaha AW2816 | Tutorial - Page 5
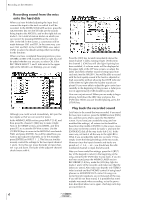
mics onto the hard disk When you have finished adjusting the input level, connect the input to the track on which it will be recorded. In the WORK NAVIGATE section, press the [QUICK REC] key. On the left side are the sounds being input to the AW2816, and on the right side are tracks 1-16 (a total of - Yamaha AW2816 | Tutorial - Page 6
it for the AW2816, refer to the AW2816's "Owner's Manual" and set it to operate as a MTC slave. Now that we have made the two devices operate in synchronization, we are ready to record. Connect the audio outputs of the rhythm to the inputs of the AW2816, make sure that the sound is being input - Yamaha AW2816 | Tutorial - Page 7
in this case is the same as when using a rhythm machine, discussed above. However, the AW2816 does not have tone generator functionality, so you will have to provide a separate MIDI sound module, use your sequencer software to play it, and then record the audio onto the AW2816. Recording vocals and - Yamaha AW2816 | Tutorial - Page 8
stereo out (which is the final output of the AW2816), but is not being recorded on track 1. Actually record the input, and verify that the effect is not applied to the recorded sound. s Tips - is it good or bad to record with effects? The AW2816 provides a very wide range of effects, but you should - Yamaha AW2816 | Tutorial - Page 9
hard disk. In this tutorial, we will assume that an ATAPI-connected CD-RW drive has already been installed in the AW2816. However, it is also possible to use an external SCSI CD-RW drive. For details on how to install a CD-RW drive, refer to the AW2816's "Owner's Manual." Restoring to the hard disk - Yamaha AW2816 | Tutorial - Page 10
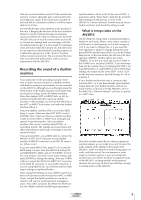
recorded tracks tracks. The following table shows the track contents of the included demo song. 1 2 3 4 Kick Snare Overhead (L) Overhead (R) 5 Hi-hat 6 Acoustic bass 7 Percussion 8 Acoustic guitar 9 Piano 10 Synth 11 Organ 12 Electric guitar 13 14 15 16 (Chorus) 16 Vocal Tutorial - Yamaha AW2816 | Tutorial - Page 11
repeat. (For details refer to the AW2816 "Owner's Manual.") s Start with the kick and snare Use the channel [ON] keys to turn off all tracks except for the kick and snare (tracks 1 and 2). Leave the STEREO channel on. The kick and snare are recorded on tracks 1 and 2 respectively. s Adding the drum - Yamaha AW2816 | Tutorial - Page 12
sound does not stand out in comparison with the other tracks. s Adding the electric guitar Turn channel 11 "ON". Compared to the other tracks, the electric guitar track where they will not interfere with the lead vocal on track 16. s Listening to the rough mix Although you have already Tutorial 11 - Yamaha AW2816 | Tutorial - Page 13
of each track. • , press the MIXER section [VIEW tracks. You might think of using the Solo function to do this, but in this case sound" of a track. At this stage, listening to the dry sound would not be very helpful ms EQ (ATT -4 dB) LOW L-MID Q L.SHLF 6.3 dB boost to the LOW region below 70 Hz, - Yamaha AW2816 | Tutorial - Page 14
ATT -8 dB) LOW L-MID Q L.SHLF 0.70 F 187 Hz 1.00 kHz G -4.5 dB 0.0 dB H-MID 0.70 2.11 kHz +2.0 dB HIGH H.SHLF 10.0 kHz 5.5 dB EQ (ATT -7 dB) LOW L-MID Q sound that is also recorded on these tracks. 1 Press the channel 3 [SEL] key to select the overhead mic channel. 2 Press the MIXER - Yamaha AW2816 | Tutorial - Page 15
ATT -7 dB) LOW Q HPF L-MID 0.70 F 125 Hz 595 Hz G ON 2.5 dB H-MID 0.70 4.00 kHz 0.0 dB HIGH H.SHLF 16.0 kHz -3.5 dB 5 Press the MIXER section [DYN] dB 12ms 70 ms hard s Channel 6: Acoustic bass We will lower the LOW 35 Hz region by -7.5 dB to add warmth to the sound. By lowering the L- - Yamaha AW2816 | Tutorial - Page 16
ms 70 ms 2 s Channel 7: Percussion For the percussion channel, we will cut the 125 Hz region by -8.0 dB to reduce the weight of the low range, making the sound a bit lighter. In the dynamics section, we will use a compander to increase the perceived loudness to compensate for the reduction in the - Yamaha AW2816 | Tutorial - Page 17
will apply a slight boost to thicken the low-mid range, and use a compander to even out the loudness. EQ (ATT -11 dB) LOW L-MID Q HPF 6.3 F 35 Hz 2. in the 500 Hz region will bring out the core of the sound. DYNAMICS OFF EQ (ATT -7 dB) LOW L-MID Q - 0.5 F - 500 Hz G - 3.0 dB - Yamaha AW2816 | Tutorial - Page 18
, we will apply a hard compander. Type Compander Hard Threshold Ratio Out Gain Attack Release Width -17 dB 2.5:1 -6.5 dB 0 ms 70 ms 7 dB s Channel 11: Organ We will boost the mid range that adds a distinctive character to the organ sound. DYNAMICS OFF EQ (ATT -7 dB) LOW Q - F - G - L-MID - Yamaha AW2816 | Tutorial - Page 19
low range and boost the mid range of the electric guitar, giving it a brighter sound (stereo) + low (monaural) tracks. High is panned to L and R, and low is panned slightly left dynamics, tightening up the sound and cutting the noise. • Chorus 1 and 2 (high & low) EQ (ATT -7 dB) LOW L-MID Q - - Yamaha AW2816 | Tutorial - Page 20
ms 4 dB • Dynamics settings for chorus 3: OFF s Channel 16: Lead vocal The lead vocalist on this channel has a strong and rich low-mid range, but in order to give the sound more definition, we will set L-Mid to 236 Hz and button and press the [ENTER] key. The song has now been saved. Tutorial 19 - Yamaha AW2816 | Tutorial - Page 21
) while they record. There is no hard and fast rule as to when in the mixing process ambience should be added, but in this tutorial we will handle it as a separate process. This is because unlike EQ or compressor, ambience effects do not directly affect the actual sound of the tracks. Ambience does - Yamaha AW2816 | Tutorial - Page 22
the drums, but even in this case it is applied only to a specific drum (such as the snare). In order to do this, it is obviously necessary to record the snare on its own track. On the other hand, it is just fine to leave the drum sound completely dry. In the demo song - Yamaha AW2816 | Tutorial - Page 23
recording engineer had to make this type of adjustment manually while the actual master recording was being made. If the changes involved multiple faders or controls, it was sometimes necessary to obtain the help recording and editing automation, you can refer to the Operation Guide tutorial, sound - Yamaha AW2816 | Tutorial - Page 24
, the fader is raised once again. 5) Acoustic guitar "1:35-": During the acoustic guitar solo phrase, automix controls the effect send level to adjust the crispness and resonance of the sound. 6) Handclaps In the climactic section from 2:40, the sense of "liveness" is emphasized by slightly raising - Yamaha AW2816 | Tutorial - Page 25
during mastering. Professional engineers sometimes add a tiny amount of reverb to the overall sound to create more depth, or pass the digitally-recorded sound through an analog device to give it the warmth characteristic of analog processing. When multiple songs are recorded on one CD, significant - Yamaha AW2816 | Tutorial - Page 26
recording. (Simultaneously press the [REC] key and [PLAY] key.) 3 When the song ends, press the [STOP] key. Writing the song to a CD-R disc This procedure is explained in detail in the AW2816's "Owner's Manual," so please refer to the appropriate pages. Are you happy with your new CD? Tutorial - Yamaha AW2816 | Tutorial - Page 27
of the process. The AW2816 supports many other recording methods and mixdown functions that we were not able to introduce in these pages. We hope you will make full use of these capabilities, and even develop techniques that are not mentioned in the AW2816's "Owner's Manual." As you spend time - Yamaha AW2816 | Tutorial - Page 28
of digital audio signals. s ATAPI A specification for CD-RW drives that can be installed in the AW2816. The specification is the same as IDE, but on the AW2816 this term is used to distinguish it from the internal hard disk. s Audio source A collective term for the signals that are input to a mixer or - Yamaha AW2816 | Tutorial - Page 29
connector that uses the ALESIS ADAT format, and allows eight channels of digital audio to be input or output when connected to a compatible device. s Overdubbing A technique that can be used on multi-track recorders such as the AW2816, in which (for example) drums are recorded first, and then other - Yamaha AW2816 | Tutorial - Page 30
disks or external CD-R/RW drives. (*Do not connect the SCSI connector of the AW2816 directly to a computer. Doing so may damage both devices.) s S/N The ratio of audio signal to noise. In dB (decibel) units, this indicates the level of the residual noise that is produced when absolutely no sound - Yamaha AW2816 | Tutorial - Page 31
V766850 R1 1 IP 32 01 08 3500 AP Printed in Japan YAMAHA CORPORATION Pro Audio & Digital Musical Instrument Division P.O. Box 3, Hamamatsu, 430-8651, Japan
-
 1
1 -
 2
2 -
 3
3 -
 4
4 -
 5
5 -
 6
6 -
 7
7 -
8
-
9
-
10
-
11
-
12
-
13
-
14
-
15
-
16
-
17
-
18
-
19
-
20
-
21
-
22
-
23
-
24
-
25
-
26
-
27
-
28
-
29
-
30
-
31
 |
 |
PROFESSIONAL AUDIO WORKSTATION
PROFESSIONAL AUDIO WORKSTATION
E
Tutorial
Tutorial