Yamaha AW2816 Tutorial - Page 7
Recording sounds that you step- recorded into your sequencer - help
 |
View all Yamaha AW2816 manuals
Add to My Manuals
Save this manual to your list of manuals |
Page 7 highlights
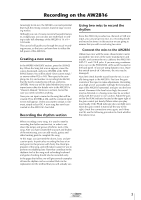
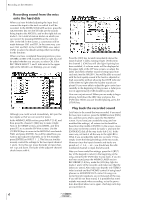
Recording on the AW2816 Recording sounds that you steprecorded into your sequencer The basic idea in this case is the same as when using a rhythm machine, discussed above. However, the AW2816 does not have tone generator functionality, so you will have to provide a separate MIDI sound module, use your sequencer software to play it, and then record the audio onto the AW2816. Recording vocals and acoustic instruments When you are finished recording the rhythm section, let's record the vocals, lead guitar, and acoustic instruments. Our explanation will assume that you have connected a mic to the AW2816's INPUT 1 (or 2), and will be recording a vocal. When recording a vocal, the singer will obviously need to sing while listening to the previouslyrecorded tracks. Nobody is going to make the mistake of having the vocalist listen to the existing tracks over the monitor speakers while singing into the mic, but it's worth noting that if the vocalist uses open-type headphones for monitoring, sound that leaks from the headphones can get into the mic and be recorded. We strongly recommend that you use sealed-type headphones for monitoring when recording into a mic. When recording a vocal, it is effective to use a monitor mix that is different from the real mix. For example you may want to boost the volume of specific rhythm parts, or to have a pre-recorded "scratch vocal" that the vocalist can sing along with as a guide. The AW2816 has a function called "scene memory," so first store the current settings of the MIXER section, and then create a separate mix for monitoring by the vocalist and store it in a different scene memory. This way, you will always be able to return to the same condition whenever you need to re-record the vocal at some later point. s Switching scene memories Let's try actually switching the scene. First use the SCENE MEMORY section [ ]/[ ] keys to change the scene number to other than 00. (Scene number 00 contains default settings that cannot be edited.) The scene number is displayed in the upper part of the screen, slightly toward the right side. For this example we will assume that you have selected 01. Press the [STORE] key of the SCENE MEMORY section. You will be asked to input a name for the scene, so assign an appropriate name and select OK. Next, play back the previously-recorded tracks, boost the volume of the drums and other rhythm instruments so that the vocalist will have a clear sense of the song's rhythm (while reducing the volume of the other parts). Change the setting to Scene Memory 02 and press STORE, assign an appropriate name, and select OK to save the scene. Now let's recall the scenes you saved. Change the scene number to 01 and press [RECALL]. A message will ask "Will Recall - ARE YOU SURE?", asking you whether you are sure you want to recall. Press [ENTER] on OK, and you will be back to the settings that were in effect before you modified the volume of each track for monitoring by the vocalist. In the same way, select scene 02 and press [RECALL]. Now the mixer has the settings that you previously saved for vocal monitoring. Scene memories are convenient, but if you recall a different scene without remembering to save the previous settings, they cannot be recovered, so please use caution. s Tips - vocal recording For the music of today, recording the vocal is the most important element in the recording. The volume adjustment at the input of the AW2816 is of course important, but you must also pay careful attention to the height and direction of the mic, remember to use a pop shield, and be aware of the volume and tonal character of the vocal. Your selection of a recording location is also important. The sound will differ dramatically depending on whether it was recorded in the living room or in the shower. The best settings are the settings that give you a recording that maximizes the strengths of that vocalist. Try everything you can think of that will help the vocalist perform at peak ability. You will probably not get a good recording if the vocalist is very tense or nervous. If you create an appropriately relaxed atmosphere for your vocalist, you will get a good recording that takes full advantage of the broad dynamic range offered by the AW2816 (very broad, since you can even use 24 bit recording!). 6 Tutorial
-
 1
1 -
 2
2 -
 3
3 -
 4
4 -
 5
5 -
 6
6 -
 7
7 -
 8
8 -
 9
9 -
 10
10 -
 11
11 -
 12
12 -
13
-
14
-
15
-
16
-
17
-
18
-
19
-
20
-
21
-
22
-
23
-
24
-
25
-
26
-
27
-
28
-
29
-
30
-
31
 |
 |