Yamaha CVP-203 Owner's Manual - Page 142
Copying and Formatting Disks — Disk, Copying from Disk to Disk, Now copying, CANCEL.
 |
View all Yamaha CVP-203 manuals
Add to My Manuals
Save this manual to your list of manuals |
Page 142 highlights
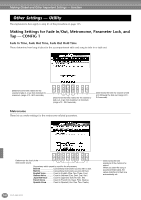
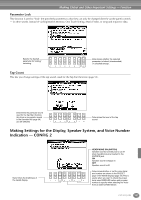
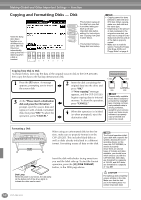
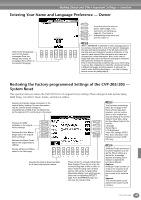
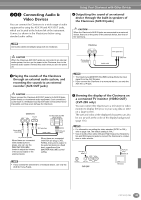
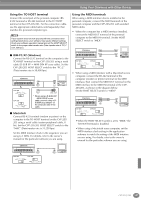
Making Global and Other Important Settings - Function Copying and Formatting Disks - Disk Turns the Song Auto Open function on or off. When this is set to "ON," the Clavinova automatically calls up the first disk song when a disk is inserted. This function copies all the data from one disk to another, letting you back up all your important data before editing. For instructions, see "Copying from Disk to Disk" below. This function formats a floppy disk (see below). • Copying cannot be done between a 2DD disk and 2HD disk. When copying, make sure both disk are the same type. • Depending on the amount of data contained in the original source disk, you may have to swap the two disks several times until all of the data is properly copied. • Make sure to read the section "Using the Floppy Disk Drive (FDD) and Floppy Disks" on page 6. Copying from Disk to Disk As shown below, first copy the data of the original (source) disk to the CVP-205/203, then copy the data to the backup (destination) disk. 1 Press the [F] button. A message appears, prompting you to insert the source disk. 3 At the "Please insert a destination disk and press the OK button " prompt, eject the source disk and replace it with a blank, formatted disk, then press "OK." To abort the operation, press "CANCEL." 2 Insert the disk containing the original data into the drive and press "OK." A "Now copying" message appears, and the CVP-205/203 begins copying data to internal memory. To abort the operation, press "CANCEL." 4 When the operation is finished (or when prompted), eject the destination disk. Internal memory Copy Copy Source disk Destination disk Commercially available music data is subject to protection by copyright laws. Copying commercially available data is strictly prohibited, except for your own personal use. Some music software is purposely copy-protected and cannot be copied. Formatting a Disk When using an unformatted disk for the first time, make sure to properly format it on the CVP-205/203. This includes blank disks as well as disks already initialized in a different format. Formatting erases all data on the disk. Insert the disk with shutter facing away from you and the label side up. To start the Format operation, press the [H] (DISK FORMAT) button, in the DISK page above. Disk Lamp When the power is turned on, the disk lamp (at the bottom left of the drive) lights to indicate the drive can be used. The Format operation initializes a disk with a specific file system, allowing the corresponding device (in this case, the CVP-205/203) to access it properly. Since there are several types of formats and disks available, you should know which ones to use with the CVP-205/203. 2DD disks are formatted to a capacity of 720 KB, and 2HD disks are formatted to a capacity of 1.44 MB. CAUTION Formatting a disk completely erases all data on the disk. Make sure that the disk you're formatting does not contain important data! 142 CVP-205/203
-
 1
1 -
2
-
3
-
4
-
5
-
6
-
7
-
8
-
9
-
10
-
11
-
12
-
13
-
14
-
15
-
16
-
17
-
18
-
19
-
20
-
21
-
22
-
23
-
24
-
25
-
26
-
27
-
28
-
29
-
30
-
31
-
32
-
33
-
34
-
35
-
36
-
37
-
38
-
39
-
40
-
41
-
42
-
43
-
44
-
45
-
46
-
47
-
48
-
49
-
50
-
51
-
52
-
53
-
54
-
55
-
56
-
57
-
58
-
59
-
60
-
61
-
62
-
63
-
64
-
65
-
66
-
67
-
68
-
69
-
70
-
71
-
72
-
73
-
74
-
75
-
76
-
77
-
78
-
79
-
80
-
81
-
82
-
83
-
84
-
85
-
86
-
87
-
88
-
89
-
90
-
91
-
92
-
93
-
94
-
95
-
96
-
97
-
98
-
99
-
100
-
101
-
102
-
103
-
104
-
105
-
106
-
107
-
108
-
109
-
110
-
111
-
112
-
113
-
114
-
115
-
116
-
117
-
118
-
119
-
120
-
121
-
122
-
123
-
124
-
125
-
126
-
127
-
128
-
129
-
130
-
131
-
132
-
133
-
134
-
135
-
136
-
 137
137 -
 138
138 -
 139
139 -
 140
140 -
 141
141 -
 142
142 -
 143
143 -
 144
144 -
 145
145 -
 146
146 -
 147
147 -
148
-
149
-
150
-
151
-
152
-
153
-
154
-
155
-
156
-
157
-
158
-
159
-
160
-
161
-
162
-
163
-
164
-
165
-
166
-
167
-
168
-
169
-
170
 |
 |
