Yamaha QY300 Owner's Manual - Page 33
Record, Stop Recording, Record Other Tracks As Required
 |
View all Yamaha QY300 manuals
Add to My Manuals
Save this manual to your list of manuals |
Page 33 highlights
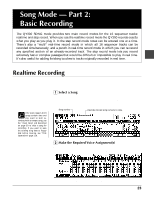
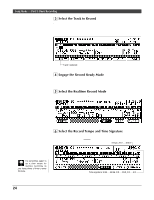
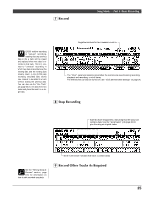
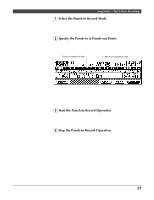
Song Mode - Part 2: Basic Recording 7 Record Press the [©] key to begin recording. The metronome will sound and you'll be given a two-measure count-in prior to the first measure actually recorded. The count-in is also indicated by negative numbers in the "Meas" parameter. If a 4/4 time signature is selected, for example, the count-in will run from measure "-08" to "-01", then recording will begin from measure "001". Negative numbers for two-measure count-in. QY300 realtime recording is "replace" recording, meaning that any previous data in the a track will be erased and replaced when new data is recorded to that track. This is in contrast to "overdub" recording in which new data is recorded over the existing data and the existing data remains intact. In the QY300 step recording, described later, allows new material to be added to a track without erasing the previous data. You can also use the "Mix Track" job (page 50) to mix data from two tracks and place the result on a single track. The "Click" parameter determines whether the metronome sounds during recording, playback and recording, or at all times. The metronome can also be turned off. See "Click (Metronome) Settings" on page 26. Play the required part either on the micro-keyboard or via an external MIDI keyboard. 8 Stop Recording Press the [m] key to stop recording. The normal SONG play mode is automatically re-selected when you stop recording, and you'll automatically be returned to the top (first measure) of the song. Asterisks have disappeared, indicating that the song now contains data. Use the "Song Name" job (page 54) to give the song an original name. Solid mute button indicates that track 1 contains data. See the "Editing Songs & Phrases" section, page 104, for information on how to edit recorded song data. 9 Record Other Tracks As Required Repeat steps 2 through 8 to record other sequencer tracks, as required. 25
-
 1
1 -
2
-
3
-
4
-
5
-
6
-
7
-
8
-
9
-
10
-
11
-
12
-
13
-
14
-
15
-
16
-
17
-
18
-
19
-
20
-
21
-
22
-
23
-
24
-
25
-
26
-
27
-
 28
28 -
 29
29 -
 30
30 -
 31
31 -
 32
32 -
 33
33 -
 34
34 -
 35
35 -
 36
36 -
 37
37 -
 38
38 -
39
-
40
-
41
-
42
-
43
-
44
-
45
-
46
-
47
-
48
-
49
-
50
-
51
-
52
-
53
-
54
-
55
-
56
-
57
-
58
-
59
-
60
-
61
-
62
-
63
-
64
-
65
-
66
-
67
-
68
-
69
-
70
-
71
-
72
-
73
-
74
-
75
-
76
-
77
-
78
-
79
-
80
-
81
-
82
-
83
-
84
-
85
-
86
-
87
-
88
-
89
-
90
-
91
-
92
-
93
-
94
-
95
-
96
-
97
-
98
-
99
-
100
-
101
-
102
-
103
-
104
-
105
-
106
-
107
-
108
-
109
-
110
-
111
-
112
-
113
-
114
-
115
-
116
-
117
-
118
-
119
-
120
-
121
-
122
-
123
-
124
-
125
-
126
-
127
-
128
-
129
-
130
-
131
-
132
-
133
-
134
-
135
-
136
-
137
-
138
-
139
-
140
-
141
 |
 |
