2010 Mercedes R-Class Owner's Manual - Page 62
2010 Mercedes R-Class Manual
Page 62 highlights
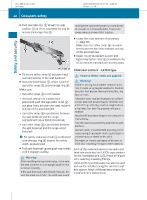
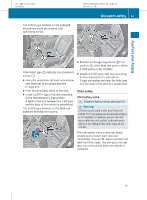
251_AKB; 4; 52, en-US d2ureepe, 2009-03-23T09:22:52+01:00 - Seite 60 Version: 2.11.8.1 60 X Occupant safety Fold seat backrest ; forward to seat cushion = as far as necessary for you to access anchorage ring ?. no longer be supported properly or positioned to provide its intended benefit. That could cause serious or even fatal injuries. X Safety and security Lower the head restraint if necessary (Y page 88). Make sure top tether strap B can pass freely between the head restraint and top of the seat backrest. X Install the child restraint system and tighten top tether strap B according to the child restraint manufacturer's instructions. Child seat anchors - LATCH-type X Guide top tether strap B between head restraint and top of the seat backrest. X Securely fasten hook A, which is part of top tether strap B, to anchorage ring ?. Make sure Rtop Rthe tether strap B is not twisted head restraint is installed and positioned such that top tether strap B can pass freely between the head restraint and top of the seat backrest tether strap B is positioned between the seat backrest and the cargo compartment cover blind (if installed) tether strap B is positioned between the seat backrest and the cargo net (if installed) Rtop Rtop i For safety, make sure hook A is attached to anchorage ring ? beyond the safety catch, as illustrated. X Fold seat backrest up and push backwards until it engages audibly. G Warning! After installing the top tether strap, make sure the seat backrest is in an upright position and is locked properly. If the seat backrest is not locked properly, the seat backrest could fold. The child seat would G Warning! Children too big for a toddler restraint must ride in seats using regular seat belts. Position shoulder belt across chest and shoulder, not face or neck. A booster seat may be necessary to achieve proper seat belt positioning for children over 41 lb (18 kg) until they reach a height where a lap/shoulder belt fits properly without a booster. Install child seat according to manufacturer's instructions. The child seat must be firmly attached to both anchors. An incorrectly mounted child seat may come loose during an accident which could result in serious injury or death to the child. Damaged or impact damaged child seats or child seat mounting fittings must be replaced. Each of the outboard second-row seats and third-row seats has two LATCH-type anchors for the installation of a LATCH-type child seat with matching mounting fittings. Non-LATCH-type child seats may also be used and can be installed using the vehicle's seat belt system. Install child seat according to the manufacturer's instructions. G Observe Safety notes, see page 55.
-
 1
1 -
2
-
3
-
4
-
5
-
6
-
7
-
8
-
9
-
10
-
11
-
12
-
13
-
14
-
15
-
16
-
17
-
18
-
19
-
20
-
21
-
22
-
23
-
24
-
25
-
26
-
27
-
28
-
29
-
30
-
31
-
32
-
33
-
34
-
35
-
36
-
37
-
38
-
39
-
40
-
41
-
42
-
43
-
44
-
45
-
46
-
47
-
48
-
49
-
50
-
51
-
52
-
53
-
54
-
55
-
56
-
 57
57 -
 58
58 -
 59
59 -
 60
60 -
 61
61 -
 62
62 -
 63
63 -
 64
64 -
 65
65 -
 66
66 -
 67
67 -
68
-
69
-
70
-
71
-
72
-
73
-
74
-
75
-
76
-
77
-
78
-
79
-
80
-
81
-
82
-
83
-
84
-
85
-
86
-
87
-
88
-
89
-
90
-
91
-
92
-
93
-
94
-
95
-
96
-
97
-
98
-
99
-
100
-
101
-
102
-
103
-
104
-
105
-
106
-
107
-
108
-
109
-
110
-
111
-
112
-
113
-
114
-
115
-
116
-
117
-
118
-
119
-
120
-
121
-
122
-
123
-
124
-
125
-
126
-
127
-
128
-
129
-
130
-
131
-
132
-
133
-
134
-
135
-
136
-
137
-
138
-
139
-
140
-
141
-
142
-
143
-
144
-
145
-
146
-
147
-
148
-
149
-
150
-
151
-
152
-
153
-
154
-
155
-
156
-
157
-
158
-
159
-
160
-
161
-
162
-
163
-
164
-
165
-
166
-
167
-
168
-
169
-
170
-
171
-
172
-
173
-
174
-
175
-
176
-
177
-
178
-
179
-
180
-
181
-
182
-
183
-
184
-
185
-
186
-
187
-
188
-
189
-
190
-
191
-
192
-
193
-
194
-
195
-
196
-
197
-
198
-
199
-
200
-
201
-
202
-
203
-
204
-
205
-
206
-
207
-
208
-
209
-
210
-
211
-
212
-
213
-
214
-
215
-
216
-
217
-
218
-
219
-
220
-
221
-
222
-
223
-
224
-
225
-
226
-
227
-
228
-
229
-
230
-
231
-
232
-
233
-
234
-
235
-
236
-
237
-
238
-
239
-
240
-
241
-
242
-
243
-
244
-
245
-
246
-
247
-
248
-
249
-
250
-
251
-
252
-
253
-
254
-
255
-
256
-
257
-
258
-
259
-
260
-
261
-
262
-
263
-
264
-
265
-
266
-
267
-
268
-
269
-
270
-
271
-
272
-
273
-
274
-
275
-
276
-
277
-
278
-
279
-
280
-
281
-
282
-
283
-
284
-
285
-
286
-
287
-
288
-
289
-
290
-
291
-
292
-
293
-
294
-
295
-
296
-
297
-
298
-
299
-
300
-
301
-
302
-
303
-
304
-
305
-
306
-
307
-
308
-
309
-
310
-
311
-
312
-
313
-
314
-
315
-
316
-
317
-
318
-
319
-
320
-
321
-
322
-
323
-
324
-
325
-
326
-
327
-
328
-
329
-
330
-
331
-
332
-
333
-
334
-
335
-
336
-
337
-
338
-
339
-
340
-
341
-
342
-
343
-
344
-
345
-
346
-
347
-
348
-
349
-
350
-
351
-
352
-
353
-
354
-
355
-
356
-
357
-
358
-
359
-
360
-
361
-
362
-
363
-
364
 |
 |
