3Com 3C94024 Getting Started Guide - Page 17
Installing the System, Before You Begin, Installing the System on a Table Top
 |
UPC - 662705154404
View all 3Com 3C94024 manuals
Add to My Manuals
Save this manual to your list of manuals |
Page 17 highlights
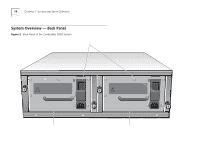
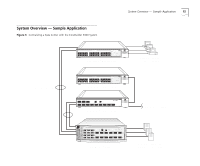
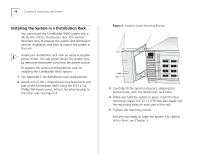
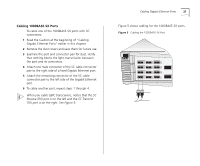
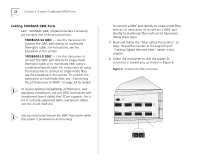
2 INSTALLING THE SYSTEM This chapter describes how to install your CoreBuilder® 9400 system on a table top or in a distribution rack. See Appendix C for site requirements. s To install the CoreBuilder 9400 system on a table top, read these sections: s "Before You Begin" (the next section) s "Installing the System on a Table Top" on page 17 s To install the CoreBuilder 9400 system in a distribution rack, read these sections: s "Before You Begin" (the next section) s "Installing the System in a Distribution Rack" on page 18 Before You Begin Before you begin this procedure, be sure to: s Move the CoreBuilder 9400 system close to where you plan to install it. Install the system near an easily accessible power outlet. You can power down the system only by removing the power cord from the power source. s Have a No. 2 Phillips screwdriver available. s Have the system mounting kit available. See Table 3. Table 3 CoreBuilder 9400 System Mounting Kit Item Rubber feet (self-adhesive) Mounting brackets 8-32 x 1/2 Phillips flat-head screws 10-32 x 1/2 Phillips pan-head screws Qty To use in 4 Installing the system on a table top 2 Installing the system in a distribution rack 8 Installing distribution-rack mounting brackets 4 Installing the system in a distribution rack Installing the System on a Table Top To install the CoreBuilder 9400 system on a table top, follow these instructions: 1 See Appendix C for site requirements. 2 Turn the system on its side. 3 Remove the protective covering from the rubber feet and place one foot in each marked area at the four corners of the unit. 4 Turn the system onto its feet. 5 Verify that the air intake vents and fan exhaust vents at the sides of the system are not blocked. You are now ready to cable your system. For instructions, see Chapter 3.
-
 1
1 -
2
-
3
-
4
-
5
-
6
-
7
-
8
-
9
-
10
-
11
-
 12
12 -
 13
13 -
 14
14 -
 15
15 -
 16
16 -
 17
17 -
 18
18 -
 19
19 -
 20
20 -
 21
21 -
 22
22 -
23
-
24
-
25
-
26
-
27
-
28
-
29
-
30
-
31
-
32
-
33
-
34
-
35
-
36
-
37
-
38
-
39
-
40
-
41
-
42
-
43
-
44
-
45
-
46
-
47
-
48
-
49
-
50
-
51
-
52
-
53
-
54
-
55
-
56
-
57
-
58
-
59
-
60
-
61
-
62
-
63
-
64
 |
 |
