3Com 3C94024 Getting Started Guide - Page 18
Installing the System in a Distribution Rack, While you hold the system in place, insert the four
 |
UPC - 662705154404
View all 3Com 3C94024 manuals
Add to My Manuals
Save this manual to your list of manuals |
Page 18 highlights
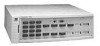
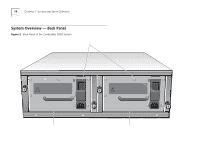
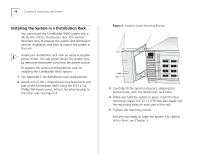
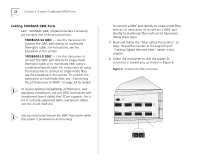
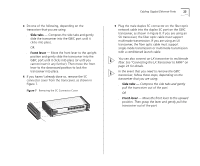
18 CHAPTER 2: INSTALLING THE SYSTEM Installing the System in a Distribution Rack You can mount the CoreBuilder 9400 system into a 48.26 mm (19-in.) distribution rack. This section describes how to prepare the system and distribution rack for installation and how to mount the system in the rack. Install your distribution rack near an easily accessible power outlet. You can power down the system only by removing the power cord from the power source. To prepare the system and distribution rack for installing the CoreBuilder 9400 system: 1 See Appendix C for distribution rack requirements. 2 Attach one of the L-shaped mounting brackets to one side of the CoreBuilder 9400 using the 8-32 x 1/2 Phillips flat-head screws. Attach the other bracket to the other side. See Figure 4. Figure 4 Installing System Mounting Brackets Mounting screws Mounting bracket R 3C94024 1000BASE SX TX 1 RX TX 2 RX TX 1000BASE SX TX 4 RX TX 5 RX TX 1000BASE SX TX 7 RX TX 8 RX TX 1000BASE SX TX 10 RX TX 11 RX TX 3 Carefully lift the system into place, aligning the bracket holes with the distribution rack holes. 4 While you hold the system in place, insert the four mounting screws (10-32 x 1/2 Phillips pan-head) into the mounting holes on each side of the rack. 5 Tighten the mounting screws. You are now ready to cable the system. For cabling instructions, see Chapter 3.
-
 1
1 -
2
-
3
-
4
-
5
-
6
-
7
-
8
-
9
-
10
-
11
-
12
-
 13
13 -
 14
14 -
 15
15 -
 16
16 -
 17
17 -
 18
18 -
 19
19 -
 20
20 -
 21
21 -
 22
22 -
 23
23 -
24
-
25
-
26
-
27
-
28
-
29
-
30
-
31
-
32
-
33
-
34
-
35
-
36
-
37
-
38
-
39
-
40
-
41
-
42
-
43
-
44
-
45
-
46
-
47
-
48
-
49
-
50
-
51
-
52
-
53
-
54
-
55
-
56
-
57
-
58
-
59
-
60
-
61
-
62
-
63
-
64
 |
 |
