3Com 3C94024 Getting Started Guide - Page 44
CAUTION, supply to the chassis.
 |
UPC - 662705154404
View all 3Com 3C94024 manuals
Add to My Manuals
Save this manual to your list of manuals |
Page 44 highlights
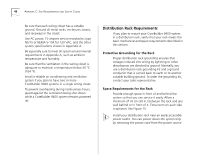
44 APPENDIX B: FIELD-REPLACEABLE UNITS 4 Grasp the handle of the new power supply and gently slide it into the chassis. 5 To seat the power supply, ensure that all connectors are aligned. Then push the power supply inward until the connectors engage and latch. The latch should slide up. You feel a slight resistance as the connectors engage. CAUTION: If the resistance is too great, the connectors may not be aligned. Forcing the power supply inward could damage the connectors. If necessary, remove and reinsert the power supply, ensuring that the connectors are properly aligned. 6 Tighten the captive screws that secure the power supply to the chassis. 7 Plug the power cord into the system. 8 Plug the other end of the power cord into the building's power outlet. If your system has two power supplies, be sure to plug in the second power supply. Leaving the second power supply unplugged causes the system diagnostics to generate a power supply error. Figure 13 Removing and Replacing the Power Supplies Power supply Power supply latch DC OK ! Power receptacle
-
 1
1 -
2
-
3
-
4
-
5
-
6
-
7
-
8
-
9
-
10
-
11
-
12
-
13
-
14
-
15
-
16
-
17
-
18
-
19
-
20
-
21
-
22
-
23
-
24
-
25
-
26
-
27
-
28
-
29
-
30
-
31
-
32
-
33
-
34
-
35
-
36
-
37
-
38
-
 39
39 -
 40
40 -
 41
41 -
 42
42 -
 43
43 -
 44
44 -
 45
45 -
 46
46 -
 47
47 -
 48
48 -
 49
49 -
50
-
51
-
52
-
53
-
54
-
55
-
56
-
57
-
58
-
59
-
60
-
61
-
62
-
63
-
64
 |
 |
