ATI X700 User Guide - Page 10
Primary, Secondary, To connect your monitors, To set up a multi-monitor display - ati driver
 |
UPC - 727419411974
View all ATI X700 manuals
Add to My Manuals
Save this manual to your list of manuals |
Page 10 highlights
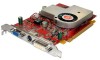
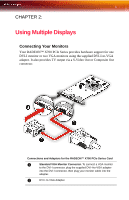
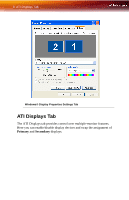
4 Connections and Adapters for the RADEON™ X700 PCIe Series Card Z DVI-I Backplate Connection. To connect a flat panel, plug the monitors DVI-I connector into the DVI-I connection. Note: If you use multiple monitors, the RADEON™ X700 PCIe Series card must be the primary graphics card. Normally, the system BIOS determines which graphics card will be the primary. To connect your monitors 1 Power off your computer and monitors. 2 Plug the monitor cables into their appropriate connectors. 3 Power on your monitors first, and then restart your computer so that Windows® can detect the new hardware settings. 4 When the New Hardware Found Wizard appears, at the appropriate prompt insert the ATI Installation CD to load the drivers for your RADEON™ X700 PCIe Series card. To set up a multi-monitor display 1 From the Start menu click Control Panel, then Display. Click the Settings tab to access the basic multi-monitor configuration settings. Note: ATI software provides many additional configuration features that can be accessed by clicking the Advanced button from the Display Properties > Settings tab. 2 Select the Monitor icon identified by the number 2. 3 Click Extend my Windows desktop onto this monitor. 4 Set the Screen Resolution and Color Quality as appropriate for the second monitor. Click Apply or OK to apply these new values. • Refer to your Windows® online help and documentation for further information on using the Settings tab. Note: When you use multiple monitors with your card, one monitor will always be Primary. Any additional monitors will be designated as Secondary.
-
 1
1 -
2
-
3
-
4
-
 5
5 -
 6
6 -
 7
7 -
 8
8 -
 9
9 -
 10
10 -
 11
11 -
 12
12 -
 13
13 -
 14
14 -
 15
15 -
16
-
17
-
18
-
19
-
20
-
21
-
22
-
23
-
24
-
25
-
26
-
27
-
28
-
29
-
30
-
31
-
32
-
33
-
34
-
35
-
36
-
37
-
38
-
39
-
40
-
41
-
42
-
43
-
44
-
45
-
46
-
47
-
48
-
49
-
50
-
51
-
52
-
53
-
54
-
55
-
56
-
57
-
58
-
59
-
60
-
61
 |
 |