Aastra OpenCom 510 User Guide - Page 32
Explanatory Note on Shutting Down the System, the central control module and cannot be changed. If
 |
View all Aastra OpenCom 510 manuals
Add to My Manuals
Save this manual to your list of manuals |
Page 32 highlights
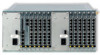
Installation Installing Modules 6. Carefully push the central control module into slot 0 (see also the illustration OpenCom 510: 1-12 frame slots on page 26). The printing on the front of the module should be at the top. Ensure that the backplane plug of the central control module is securely plugged into the socket on the backplane. 7. Refit the screws to secure the module in the 1-12 frame. 8. Plug the desired cables into the corresponding RJ45 sockets on the central control module. Refer to Modules starting on page 65 for information on pin assignment. 9. Switch the OpenCom 510 on again. To do so, reconnect the group 1 power supply unit (see A in the illustration OpenCom 510: 1-12 frame slots on page 26) with the mains supply (if you are powering the OpenCom 510 with two power supply units, reconnect the second unit as well). The system will now start up and all modules (interface cards) will be re-initialised. 10.Observe the module LEDs during start-up of the OpenCom 510. Information on indicators can be found in Modules starting on page 65. Note: The MAC address for the OpenCom 510 is assigned by the central control module and cannot be changed. If the central control module has to be exchanged, you may need to change the IP settings. For further information on MAC addresses, refer to the online help. Explanatory Note on Shutting Down the System If the OpenCom 510 is disconnected from the mains supply, its main memory is deleted. The main memory stores the current configuration data, which are regularly copied to the CompactFlash memory card. Restarting the system causes it to copy the current configuration data from the main memory to the CompactFlash card, which ensures that the most recent configuration is restored when the system is started up. 30
-
 1
1 -
2
-
3
-
4
-
5
-
6
-
7
-
8
-
9
-
10
-
11
-
12
-
13
-
14
-
15
-
16
-
17
-
18
-
19
-
20
-
21
-
22
-
23
-
24
-
25
-
26
-
 27
27 -
 28
28 -
 29
29 -
 30
30 -
 31
31 -
 32
32 -
 33
33 -
 34
34 -
 35
35 -
 36
36 -
 37
37 -
38
-
39
-
40
-
41
-
42
-
43
-
44
-
45
-
46
-
47
-
48
-
49
-
50
-
51
-
52
-
53
-
54
-
55
-
56
-
57
-
58
-
59
-
60
-
61
-
62
-
63
-
64
-
65
-
66
-
67
-
68
-
69
-
70
-
71
-
72
-
73
-
74
-
75
-
76
-
77
-
78
-
79
-
80
-
81
-
82
-
83
-
84
-
85
-
86
-
87
-
88
-
89
-
90
-
91
-
92
-
93
-
94
-
95
-
96
-
97
-
98
-
99
-
100
-
101
-
102
-
103
-
104
-
105
-
106
-
107
-
108
-
109
-
110
-
111
-
112
-
113
-
114
-
115
-
116
-
117
-
118
-
119
-
120
-
121
-
122
-
123
-
124
-
125
-
126
-
127
-
128
-
129
-
130
-
131
-
132
-
133
-
134
-
135
-
136
-
137
-
138
-
139
-
140
-
141
-
142
-
143
-
144
-
145
-
146
-
147
-
148
-
149
-
150
-
151
-
152
-
153
-
154
-
155
-
156
-
157
-
158
-
159
-
160
-
161
-
162
-
163
-
164
-
165
-
166
-
167
-
168
-
169
-
170
-
171
-
172
-
173
-
174
-
175
-
176
-
177
-
178
-
179
-
180
-
181
-
182
-
183
-
184
-
185
-
186
-
187
-
188
-
189
-
190
-
191
-
192
-
193
-
194
-
195
-
196
-
197
-
198
-
199
-
200
-
201
-
202
-
203
-
204
-
205
-
206
-
207
-
208
-
209
-
210
-
211
-
212
-
213
-
214
-
215
-
216
-
217
-
218
-
219
-
220
-
221
-
222
-
223
-
224
 |
 |
