Adaptec 44300 User Guide - Page 26
Before You Begin, Installing the HostRAID Controller, Read the Safety Information
 |
View all Adaptec 44300 manuals
Add to My Manuals
Save this manual to your list of manuals |
Page 26 highlights
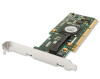
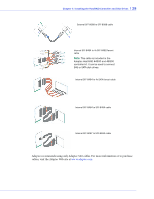
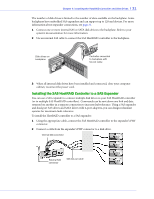
Chapter 4: Installing the HostRAID Controller and Disk Drives l 26 Before You Begin ● Read the Safety Information on page 92. ● Familiarize yourself with your HostRAID controller's physical features and the RAID levels that it supports (see page 14). ● Ensure that you have the right number of disk drives to achieve the desired RAID level (see page 63). ● Ensure that you have the proper cables for your controller and disk drives (see page 27 for SAS page 29 cables and for SATA cables). ● If you have a low-profile computer cabinet, replace the original full-height bracket with the low-profile bracket supplied in the controller kit. ! Caution: Handle the controller by its bracket or edges only. Installing the HostRAID Controller This section describes how to install your HostRAID controller into your computer cabinet. 1 Turn off your computer and disconnect the power cord. Open the cabinet, following the manufacturer's instructions. 2 Select an available PCI, PCIe or PCI-X expansion slot and remove the slot cover, as shown at right. For the best performance, use the available slot that's compatible with your HostRAID controller (see Chapter 2). PCI/PCIe bus compatibility is marked to the controller figures in About Your HostRAID Controller on page 14. ! Caution: Touch a grounded metal object before handling the HostRAID controller. 3 As shown at right, insert the HostRAID controller into the expansion slot and press down gently but firmly until it clicks into place. When installed properly, the HostRAID controller should appear level with the expansion slot. 4 Secure the bracket in the expansion slot, using the retention device (for instance, a screw or lever) supplied with your computer. 5 Connect your computer's disk activity LED cable to the LED connector on the HostRAID controller, if applicable to your controller. The LED connectors are marked on the figures in About Your HostRAID Controller on page 14. Ensure that the positive lead of the LED cable (usually a red wire or a wire marked with a red stripe) is connected to pin 1.
-
 1
1 -
2
-
3
-
4
-
5
-
6
-
7
-
8
-
9
-
10
-
11
-
12
-
13
-
14
-
15
-
16
-
17
-
18
-
19
-
20
-
 21
21 -
 22
22 -
 23
23 -
 24
24 -
 25
25 -
 26
26 -
 27
27 -
 28
28 -
 29
29 -
 30
30 -
 31
31 -
32
-
33
-
34
-
35
-
36
-
37
-
38
-
39
-
40
-
41
-
42
-
43
-
44
-
45
-
46
-
47
-
48
-
49
-
50
-
51
-
52
-
53
-
54
-
55
-
56
-
57
-
58
-
59
-
60
-
61
-
62
-
63
-
64
-
65
-
66
-
67
-
68
-
69
-
70
-
71
-
72
-
73
-
74
-
75
-
76
-
77
-
78
-
79
-
80
-
81
-
82
-
83
-
84
-
85
-
86
-
87
-
88
-
89
-
90
-
91
-
92
-
93
-
94
-
95
-
96
-
97
-
98
-
99
-
100
-
101
-
102
-
103
-
104
 |
 |
