Adaptec 44300 User Guide - Page 35
Choosing a RAID Level, Choosing Installation Options, Basic Installation Steps - driver
 |
View all Adaptec 44300 manuals
Add to My Manuals
Save this manual to your list of manuals |
Page 35 highlights
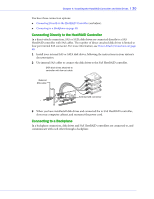
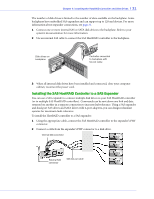
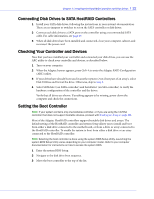
Chapter 5: Getting Started l 35 Choosing a RAID Level Your HostRAID controller supports these RAID levels. RAID 0 (Non-redundant Array)-Stripes data across multiple disk drives. Improved performance but no redundancy. RAID 1 Array-Created from two disk drives where one disk drive is a mirror of the other (the same data is stored on each disk drive). Redundancy but reduced capacity. RAID 10 Array-Built from two or more equal-sized RAID 1 arrays, stripes and mirrors data across multiple disk drives. Redundancy and improved performance. See page 63 for more information on RAID levels and use the table on page 64 to see how many disk drives you must connect to your HostRAID controller to support the RAID level you want. Choosing Installation Options When you install your HostRAID controller, you can choose to create a bootable array and then install both operating system and controller driver on that array. Alternatively, you can complete a standard installation, where you install the controller driver on an existing operating system. Note: Adaptec 1225SA controller does not support bootable devices, hence install this controller only on an existing operating system. Basic Installation Steps This section describes the installation process. Follow the steps for the installation option you've chosen. Installing with an Operating System You can install your HostRAID controller and the operating system using these steps: 1 Install and connect your controller and disk drives (see page 25). 2 Set the boot controller (see page 37). 3 Make the array bootable (see page 40). 4 Install your operating system and the driver (see page 41). 5 Install Adaptec Storage Manager and begin to manage your data storage (see page 49). Installing with an Operating System On a Bootable Disk Drive or Array When you install your HostRAID controller, you can create a bootable disk drive or an array and then install both operating system and controller driver on that disk drive or array. Alternatively, you can perform the standard installation, and install the controller driver on an existing operating system 1 Install and connect your controller and internal disk drives (see page 25). If your controller has an external connector, you can also connect external disk drives, if required.
-
 1
1 -
2
-
3
-
4
-
5
-
6
-
7
-
8
-
9
-
10
-
11
-
12
-
13
-
14
-
15
-
16
-
17
-
18
-
19
-
20
-
21
-
22
-
23
-
24
-
25
-
26
-
27
-
28
-
29
-
 30
30 -
 31
31 -
 32
32 -
 33
33 -
 34
34 -
 35
35 -
 36
36 -
 37
37 -
 38
38 -
 39
39 -
 40
40 -
41
-
42
-
43
-
44
-
45
-
46
-
47
-
48
-
49
-
50
-
51
-
52
-
53
-
54
-
55
-
56
-
57
-
58
-
59
-
60
-
61
-
62
-
63
-
64
-
65
-
66
-
67
-
68
-
69
-
70
-
71
-
72
-
73
-
74
-
75
-
76
-
77
-
78
-
79
-
80
-
81
-
82
-
83
-
84
-
85
-
86
-
87
-
88
-
89
-
90
-
91
-
92
-
93
-
94
-
95
-
96
-
97
-
98
-
99
-
100
-
101
-
102
-
103
-
104
 |
 |