Adobe 22030000 User Guide - Page 153
Navigation for audio and subtitle tracks, Keeping track of tracks
 |
UPC - 718659326050
View all Adobe 22030000 manuals
Add to My Manuals
Save this manual to your list of manuals |
Page 153 highlights
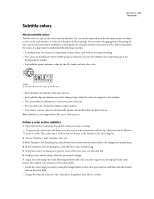
ENCORE CS3 149 User Guide Change the color group applied to a subtitle clip You can use color groups to vary the subtitles depending upon the background or to help identify or distinguish between subtitles (such as to identify speakers). 1 Open the timeline containing the subtitle colors you want to change. 2 Select the subtitle clip (or clips) that you want to alter in the timeline. To select all the subtitles on a track, doubleclick the track name. To select several subtitle clips, either Shift-click the desired clips in the track or drag a selection box around them. 3 In the Properties panel, choose the desired color group from the Highlight menu. To see the changes, move the current time indicator over the subtitles in the Timeline Viewer or click the Previous Subtitle and Next Subtitle buttons in the Monitor panel. Navigation for audio and subtitle tracks Keeping track of tracks DVD players remember audio and subtitle track selections. Once a viewer specifies an audio track (using a menu or the remote control), the player plays that same track for all timelines in the program. If a timeline does not contain the specified track, the player defaults to the Audio 1 or Subtitle 1 track for the rest of the project, even if subsequent timelines contain the originally specified track. The player references tracks by number, not by the language settings. If you have more than one timeline, each with several audio or subtitle tracks (such as language voiceovers or subtitles), use the same track for related audio or subtitles throughout the project. For example, place all Spanish subtitles on the same numbered subtitle track in each timeline, and place all director's comments on the same numbered audio track. See also "Add audio to a timeline" on page 135 "About subtitles in DVD projects" on page 136 Set the default audio and subtitle tracks When a DVD project includes audio tracks, subtitle tracks, or both, it is important to set the default tracks for the disc and to give the viewer a way to select the tracks. You do this by setting the Disc properties for default tracks. The DVD player will play these tracks throughout the program unless the viewer changes the selection. (See "Keeping track of tracks" on page 149.) 1 To make the Disc properties appear in the Properties panel, do one of the following: • Click in a blank area in the Project panel (such as the lower-left edge of the panel). • Activate the Build panel by clicking its tab. When the Build panel is active, the Properties panel contains the Disc properties. Note: If the Build panel is not open, you can open it by choosing Window > Build. 2 In the Properties panel, do one or both of the following: • If your project includes audio tracks, choose the track you want as the default from the Set Audio pop-up menu. • If your project includes subtitle tracks, choose the track you want as the default from the Set Subtitle pop-up menu.
-
 1
1 -
2
-
3
-
4
-
5
-
6
-
7
-
8
-
9
-
10
-
11
-
12
-
13
-
14
-
15
-
16
-
17
-
18
-
19
-
20
-
21
-
22
-
23
-
24
-
25
-
26
-
27
-
28
-
29
-
30
-
31
-
32
-
33
-
34
-
35
-
36
-
37
-
38
-
39
-
40
-
41
-
42
-
43
-
44
-
45
-
46
-
47
-
48
-
49
-
50
-
51
-
52
-
53
-
54
-
55
-
56
-
57
-
58
-
59
-
60
-
61
-
62
-
63
-
64
-
65
-
66
-
67
-
68
-
69
-
70
-
71
-
72
-
73
-
74
-
75
-
76
-
77
-
78
-
79
-
80
-
81
-
82
-
83
-
84
-
85
-
86
-
87
-
88
-
89
-
90
-
91
-
92
-
93
-
94
-
95
-
96
-
97
-
98
-
99
-
100
-
101
-
102
-
103
-
104
-
105
-
106
-
107
-
108
-
109
-
110
-
111
-
112
-
113
-
114
-
115
-
116
-
117
-
118
-
119
-
120
-
121
-
122
-
123
-
124
-
125
-
126
-
127
-
128
-
129
-
130
-
131
-
132
-
133
-
134
-
135
-
136
-
137
-
138
-
139
-
140
-
141
-
142
-
143
-
144
-
145
-
146
-
147
-
 148
148 -
 149
149 -
 150
150 -
 151
151 -
 152
152 -
 153
153 -
 154
154 -
 155
155 -
 156
156 -
 157
157 -
 158
158 -
159
-
160
-
161
-
162
-
163
-
164
-
165
-
166
-
167
-
168
-
169
-
170
-
171
-
172
-
173
-
174
-
175
-
176
-
177
-
178
-
179
-
180
-
181
-
182
-
183
-
184
-
185
-
186
-
187
-
188
-
189
-
190
-
191
-
192
-
193
-
194
-
195
-
196
-
197
-
198
-
199
 |
 |
