Asus P2-99B P2-99B User Manual - Page 26
Expansion Cards - driver
 |
View all Asus P2-99B manuals
Add to My Manuals
Save this manual to your list of manuals |
Page 26 highlights
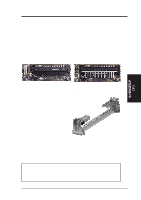
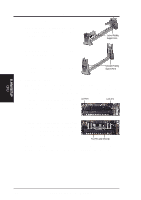
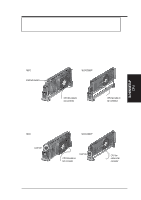
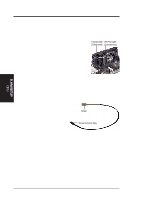
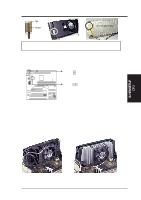
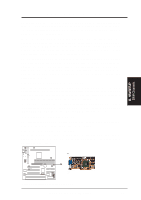
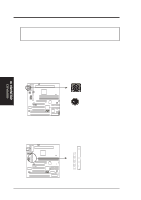
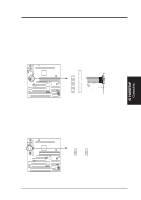
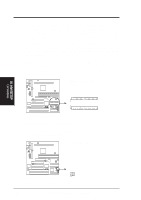
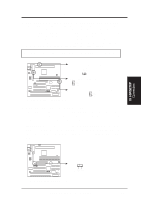
III. H/W SETUP Expansion Cards III. HARDWARE SETUP 4. Expansion Cards WARNING! Unplug your power supply when adding or removing expansion cards or other system components. Failure to do so may cause severe damage to both your motherboard and expansion cards. Expansion Card Installation Procedure 1. Read the documentation for your expansion card and make any necessary hardware or software settings for your expansion card, such as jumpers. 2. Remove your computer system's cover and the bracket plate on the slot you intend to use. Keep the bracket for possible future use. 3. Carefully align the card's connectors and press firmly. 4. Secure the card on the slot with the screw you removed above. 5. Replace the computer system's cover. 6. Set up the BIOS if necessary (such as IRQ xx Used By ISA: Yes in PNP AND PCI SETUP) 7. Install the necessary software drivers for your expansion card. Assigning IRQs for Expansion Cards Some expansion cards need to use an IRQ to operate. Generally, an IRQ must be exclusively assigned to one use. In a standard design, there are 16 IRQs available but most of them are already in use, leaving 6 IRQs free for expansion cards. If your motherboard has PCI audio onboard, an extra IRQ will be used, leaving 5 IRQs free. If your motherboard has ISA audio onboard, an extra 3 IRQs will be used, leaving 3 IRQs free. Both ISA and PCI expansion cards may require the use of IRQs. System IRQs are available to cards installed in the ISA expansion bus first, then any remaining IRQs are available to PCI cards. Currently, there are two types of ISA cards. The original ISA expansion card design, now referred to as legacy ISA cards, requires that you configure the card's jumpers manually and then install it in any available slot on the ISA bus. You may use the Microsoft Diagnostics (MSD.EXE) utility located in the Windows directory to see a map of your used and free IRQs. If you use Windows 95, the Resources tab under Device Manager displays the resource settings being used by a particular device (to gain access, double-click the System icon under the Control Panel program). Ensure that no two devices share the same IRQs or your computer will experience problems when those two devices are in use at the same time. 26 ASUS P2-99B User's Manual
-
 1
1 -
2
-
3
-
4
-
5
-
6
-
7
-
8
-
9
-
10
-
11
-
12
-
13
-
14
-
15
-
16
-
17
-
18
-
19
-
20
-
 21
21 -
 22
22 -
 23
23 -
 24
24 -
 25
25 -
 26
26 -
 27
27 -
 28
28 -
 29
29 -
 30
30 -
 31
31 -
32
-
33
-
34
-
35
-
36
-
37
-
38
-
39
-
40
-
41
-
42
-
43
-
44
-
45
-
46
-
47
-
48
-
49
-
50
-
51
-
52
-
53
-
54
-
55
-
56
-
57
-
58
-
59
-
60
-
61
-
62
-
63
-
64
-
65
-
66
-
67
-
68
-
69
-
70
-
71
-
72
-
73
-
74
-
75
-
76
-
77
-
78
-
79
-
80
-
81
-
82
-
83
-
84
-
85
-
86
-
87
-
88
-
89
-
90
-
91
-
92
-
93
-
94
-
95
-
96
 |
 |