Asus P2-99B P2-99B User Manual - Page 37
Power Connection Procedures
 |
View all Asus P2-99B manuals
Add to My Manuals
Save this manual to your list of manuals |
Page 37 highlights
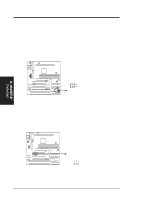
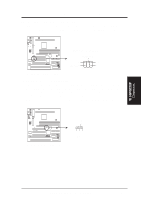
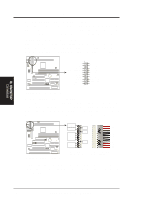
III. H/W SETUP Power Connections III. HARDWARE SETUP Power Connection Procedures 1. After all connections are made, close the system case cover. 2. Be sure that all switches are off (in some systems, marked with ). 3. Connect the power supply cord to the power supply located on the back of your system case according to your system user's manual. 4. Connect the power cord to a power outlet that is equipped with a surge protector. 5. You may then turn on your devices in the following order: a. Your monitor b. External SCSI devices (starting with the last device on the chain) c. Your system power. For ATX power supplies, you need to switch on the power supply if a switch is provided as well as press the ATX power switch on the front of the case. 6. The power LED on the front panel of the system case will light. For ATX power supplies, the system LED will light when the ATX power switch is pressed. The LED on the monitor may light up or switch between orange and green after the system's if it complies with "green" standards or if it has a power standby feature. The system will then run power-on tests. While the tests are running, additional messages will appear on the screen. If you do not see anything within 30 seconds from the time you turn on the power, the system may have failed a power-on test. Recheck your jumper settings and connections or call your retailer for assistance. 7. During power-on, hold down to enter BIOS setup. Follow the instructions in the next section, BIOS SETUP. * Powering Off your computer: You must first exit or shut down your operating system before switching off the power switch. For ATX power supplies, you can press the ATX power switch after exiting or shutting down your operating system. If you use Windows 95/98, click the Start button, click Shut Down, and then click Shut down the computer?. The power supply should turn off after Windows shuts down. NOTE: The message "You can now safely turn off your computer" will not appear when shutting down with ATX power supplies. ASUS P2-99B User's Manual 37
-
 1
1 -
2
-
3
-
4
-
5
-
6
-
7
-
8
-
9
-
10
-
11
-
12
-
13
-
14
-
15
-
16
-
17
-
18
-
19
-
20
-
21
-
22
-
23
-
24
-
25
-
26
-
27
-
28
-
29
-
30
-
31
-
 32
32 -
 33
33 -
 34
34 -
 35
35 -
 36
36 -
 37
37 -
 38
38 -
 39
39 -
 40
40 -
 41
41 -
 42
42 -
43
-
44
-
45
-
46
-
47
-
48
-
49
-
50
-
51
-
52
-
53
-
54
-
55
-
56
-
57
-
58
-
59
-
60
-
61
-
62
-
63
-
64
-
65
-
66
-
67
-
68
-
69
-
70
-
71
-
72
-
73
-
74
-
75
-
76
-
77
-
78
-
79
-
80
-
81
-
82
-
83
-
84
-
85
-
86
-
87
-
88
-
89
-
90
-
91
-
92
-
93
-
94
-
95
-
96
 |
 |
