Asus P5W User Manual - Page 187
Press <Enter> when the Create Volume item is highlighted. This warning
 |
View all Asus P5W manuals
Add to My Manuals
Save this manual to your list of manuals |
Page 187 highlights
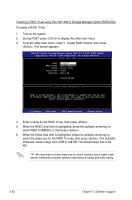
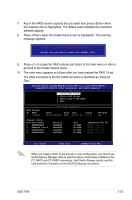
7. Key in the RAID volume capacity that you want then press when the Capacity item is highlighted. The default value indicates the maximum allowed capacity. 8. Press when the Create Volume item is highlighted. This warning message appears. WARNING: ALL DATA ON SELECTED DISKS WILL BE LOST. Are you sure you want to create this volume? (Y/N): 9. Press to create the RAID volume and return to the main menu or to go back to the Create Volume menu. 10. The main menu appears as follows after you have created the RAID 10 set. The HDD connected to the EZ_RAID connector is identified as "External Disk." Intel(R) Matrix Storage Manager Option ROM v5.1.2.1002 ICH7R wRAID5 Copyright(C) 2003-05 Intel Corporation. All Rights Reserved. [ MAIN MENU ] 1. Create RAID Volume 2. Delete RAID Volume 3. Reset Disks to Non-RAID 4. Exit RAID Volumes: ID Name 0 Volume0 [ DISK/VOLUME INFORMATION ] Level Strip Size Status RAID10(RAID0+1) XXKB XXX.XX GB Normal Bootable Yes Physical Disks: Port Drive Model 0 XXXXXXXXXXX 1 External Disk 0 2 XXXXXXXXXXX 3 XXXXXXXXXXX Serial # XXXXXXXX XXXXXXXX XXXXXXXX XXXXXXXX Size XX.XXGB XX.XXGB XX.XXGB XX.XXGB Type/Status(Vol ID) Member Disk (0) Member Disk (0) Member Disk (0) Member Disk (0) [↑↓]-Select [ESC]-Exit [ENTER]-Select Menu When you create a RAID 10 set through a cross configuration, you cannot use the EZ-Backup Manager utility to view the status of hard disks installed on the EZ_RAID1 and EZ_RAID2 connectors. Intel® Matrix Storage cannot read the hard disk drive information on the ASUS EZ-Backup connectors. ASUS P5W 5-63
-
 1
1 -
2
-
3
-
4
-
5
-
6
-
7
-
8
-
9
-
10
-
11
-
12
-
13
-
14
-
15
-
16
-
17
-
18
-
19
-
20
-
21
-
22
-
23
-
24
-
25
-
26
-
27
-
28
-
29
-
30
-
31
-
32
-
33
-
34
-
35
-
36
-
37
-
38
-
39
-
40
-
41
-
42
-
43
-
44
-
45
-
46
-
47
-
48
-
49
-
50
-
51
-
52
-
53
-
54
-
55
-
56
-
57
-
58
-
59
-
60
-
61
-
62
-
63
-
64
-
65
-
66
-
67
-
68
-
69
-
70
-
71
-
72
-
73
-
74
-
75
-
76
-
77
-
78
-
79
-
80
-
81
-
82
-
83
-
84
-
85
-
86
-
87
-
88
-
89
-
90
-
91
-
92
-
93
-
94
-
95
-
96
-
97
-
98
-
99
-
100
-
101
-
102
-
103
-
104
-
105
-
106
-
107
-
108
-
109
-
110
-
111
-
112
-
113
-
114
-
115
-
116
-
117
-
118
-
119
-
120
-
121
-
122
-
123
-
124
-
125
-
126
-
127
-
128
-
129
-
130
-
131
-
132
-
133
-
134
-
135
-
136
-
137
-
138
-
139
-
140
-
141
-
142
-
143
-
144
-
145
-
146
-
147
-
148
-
149
-
150
-
151
-
152
-
153
-
154
-
155
-
156
-
157
-
158
-
159
-
160
-
161
-
162
-
163
-
164
-
165
-
166
-
167
-
168
-
169
-
170
-
171
-
172
-
173
-
174
-
175
-
176
-
177
-
178
-
179
-
180
-
181
-
 182
182 -
 183
183 -
 184
184 -
 185
185 -
 186
186 -
 187
187 -
 188
188 -
 189
189 -
 190
190 -
 191
191 -
 192
192 -
193
-
194
-
195
-
196
-
197
-
198
-
199
-
200
-
201
-
202
-
203
-
204
-
205
-
206
-
207
-
208
-
209
-
210
 |
 |