Belkin F5D7230-4 User Manual - Page 24
Alternate Setup Method - firmware
 |
UPC - 811349013787
View all Belkin F5D7230-4 manuals
Add to My Manuals
Save this manual to your list of manuals |
Page 24 highlights
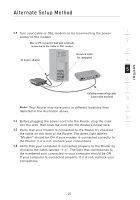
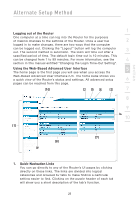
Alternate Setup Method The Web-Based Advanced User Interface is a web-based tool that you can use to set up the Router if you don't want to use the Easy Install Wizard. You can also use it to manage advanced functions of the Router. From the Web-Based Advanced User Interface, you can perform the following tasks: • View the Router's current settings and status • Configure the Router to connect to your ISP with the settings that they provided you • Change the current network settings such as the Internal IP address, the IP address pool, DHCP settings, and more • Set the Router's firewall to work with specific applications (port forwarding) • Set up security features such as client restrictions, MAC address filtering, WEP, and WPA • Enable the DMZ feature for a single computer on your network • Change the Router's internal password • Enable/Disable UPnP (Universal Plug-and-Play) • Reset the Router • Back up your configuration settings • Reset the Router's default settings • Update the Router's firmware Step 1 Connect your Router 1.1 Turn off the power to your modem by unplugging the power supply from the modem. 1.2 Locate the network cable that is connected between your modem and your computer and unplug it from your computer, leaving the other end connected to your modem. 1.3 Plug the loose end of the cable you just unplugged into the port on the back of the Router labeled "Modem". 1.4 Connect a new network cable (not included) from the back of the computer to one of the wired computers ports labeled "1-4". Note: It does not matter which numbered port you choose. 22
-
 1
1 -
2
-
3
-
4
-
5
-
6
-
7
-
8
-
9
-
10
-
11
-
12
-
13
-
14
-
15
-
16
-
17
-
18
-
 19
19 -
 20
20 -
 21
21 -
 22
22 -
 23
23 -
 24
24 -
 25
25 -
 26
26 -
 27
27 -
 28
28 -
 29
29 -
30
-
31
-
32
-
33
-
34
-
35
-
36
-
37
-
38
-
39
-
40
-
41
-
42
-
43
-
44
-
45
-
46
-
47
-
48
-
49
-
50
-
51
-
52
-
53
-
54
-
55
-
56
-
57
-
58
-
59
-
60
-
61
-
62
-
63
-
64
-
65
-
66
-
67
-
68
-
69
-
70
-
71
-
72
-
73
-
74
-
75
-
76
-
77
-
78
-
79
-
80
-
81
-
82
-
83
-
84
-
85
-
86
-
87
-
88
-
89
-
90
-
91
-
92
-
93
-
94
-
95
-
96
-
97
-
98
-
99
-
100
-
101
-
102
-
103
-
104
-
105
-
106
-
107
-
108
-
109
-
110
-
111
-
112
 |
 |