Brother International 9840CDW Software Users Manual - English - Page 186
CUSTOM SCAN, COPY / PC-FAX, DEVICE SETTINGS, Device Button, Software Button, Remote Setup, Quick-Dial - windows 8 driver
 |
UPC - 012502618744
View all Brother International 9840CDW manuals
Add to My Manuals
Save this manual to your list of manuals |
Page 186 highlights
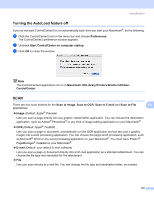
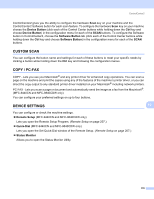
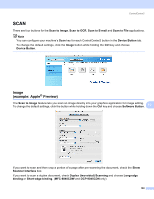
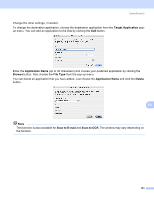
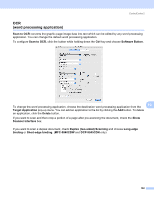
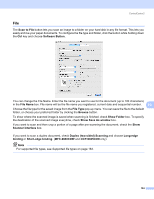
ControlCenter2 ControlCenter2 gives you the ability to configure the hardware Scan key on your machine and the ControlCenter2 Software button for each scan feature. To configure the hardware Scan key on your machine choose the Device Button (click each of the Control Center buttons while holding down the Ctrl key and choose Device Button) in the configuration menu for each of the SCAN buttons. To configure the Software button in ControlCenter2, choose the Software Button tab (click each of the Control Center buttons while holding down the Ctrl key and choose Software Button) in the configuration menu for each of the SCAN buttons. CUSTOM SCAN 10 You can configure the button name and settings for each of these buttons to meet your specific needs by clicking a button while holding down the Ctrl key and following the configuration menus. COPY / PC-FAX 10 COPY - Lets you use your Macintosh® and any printer driver for enhanced copy operations. You can scan a page on the machine and print the copies using any of the features of the machine's printer driver, or you can direct the copy output to any standard printer driver installed on your Macintosh® including network printers. PC-FAX - Lets you scan a page or document and automatically send the image as a fax from the Macintosh®. (MFC-9440CN and MFC-9840CDW only) You can configure your preferred settings on up to four buttons. DEVICE SETTINGS You can configure or check the machine settings. „ Remote Setup (MFC-9440CN and MFC-9840CDW only) Lets you open the Remote Setup Program. (Remote Setup on page 207.) „ Quick-Dial (MFC-9440CN and MFC-9840CDW only) Lets you open the Set Quick-Dial window of the Remote Setup. (Remote Setup on page 207.) „ Status Monitor Allows you to open the Status Monitor Utility. 10 10 179
-
 1
1 -
2
-
3
-
4
-
5
-
6
-
7
-
8
-
9
-
10
-
11
-
12
-
13
-
14
-
15
-
16
-
17
-
18
-
19
-
20
-
21
-
22
-
23
-
24
-
25
-
26
-
27
-
28
-
29
-
30
-
31
-
32
-
33
-
34
-
35
-
36
-
37
-
38
-
39
-
40
-
41
-
42
-
43
-
44
-
45
-
46
-
47
-
48
-
49
-
50
-
51
-
52
-
53
-
54
-
55
-
56
-
57
-
58
-
59
-
60
-
61
-
62
-
63
-
64
-
65
-
66
-
67
-
68
-
69
-
70
-
71
-
72
-
73
-
74
-
75
-
76
-
77
-
78
-
79
-
80
-
81
-
82
-
83
-
84
-
85
-
86
-
87
-
88
-
89
-
90
-
91
-
92
-
93
-
94
-
95
-
96
-
97
-
98
-
99
-
100
-
101
-
102
-
103
-
104
-
105
-
106
-
107
-
108
-
109
-
110
-
111
-
112
-
113
-
114
-
115
-
116
-
117
-
118
-
119
-
120
-
121
-
122
-
123
-
124
-
125
-
126
-
127
-
128
-
129
-
130
-
131
-
132
-
133
-
134
-
135
-
136
-
137
-
138
-
139
-
140
-
141
-
142
-
143
-
144
-
145
-
146
-
147
-
148
-
149
-
150
-
151
-
152
-
153
-
154
-
155
-
156
-
157
-
158
-
159
-
160
-
161
-
162
-
163
-
164
-
165
-
166
-
167
-
168
-
169
-
170
-
171
-
172
-
173
-
174
-
175
-
176
-
177
-
178
-
179
-
180
-
 181
181 -
 182
182 -
 183
183 -
 184
184 -
 185
185 -
 186
186 -
 187
187 -
 188
188 -
 189
189 -
 190
190 -
 191
191 -
192
-
193
-
194
-
195
-
196
-
197
-
198
-
199
-
200
-
201
-
202
-
203
-
204
-
205
-
206
-
207
-
208
-
209
-
210
-
211
-
212
-
213
-
214
-
215
-
216
-
217
 |
 |
