Brother International HL 5030 Service Manual - Page 249
Controller Firmware ROM 0, Rewriting procedure For AVA file, ENTER, Job Cnacel, Cancel, Paper, Status
 |
View all Brother International HL 5030 manuals
Add to My Manuals
Save this manual to your list of manuals |
Page 249 highlights
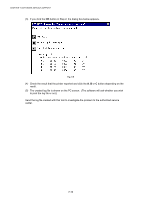
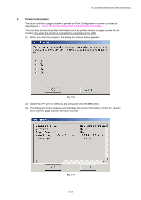
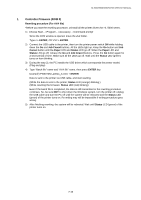
HL-5030/5040/5050/5070N SERVICE MANUAL 1. Controller Firmware (ROM 0) Rewriting procedure (For AVA file) *Before you start the rewriting procedure, uninstall all the printer drivers for HL-5000 series. 1) Choose Start...>Program...>Accessory...>Command prompt Since the DOS window is opened, move the ZL2 folder. Type c:+ ENTER, CD \ZL2 + ENTER. 2) Connect the USB cable to the printer, then turn the printer power switch ON while holding down the Go and Job Cnacel buttons. All the LEDs light up. Keep the Go button and Job Cancel button until the Paper LED and Status LED go off. When the Paper LED and Status LED go off, release the Go and Job Cnacel buttons. Press the Go button again for a short period of time. Make sure all the LEDs go off. Wait until the Status LED (green) turns on from blinking. 3) During the step 2), the PC installs the USB driver which corresponds the printer model. (Plug and play) 4) Type "Batch file" name and "AVA file" name, then press ENTER key. Example) FW5070N LZ0011_A.AVA + ENTER Data is sent to the printer via USB cable, and start rewiting. (While the data is sent to the printer; Status LED (orange) blinking.) (While rewriting the firmware; Status LED (red) blinking) Even if the batch file is completed, the data is still transmitted or the rewriting procedure continues. So, be sure NOT to shut down the Windows system, turn the printer off, unplug the USB cable and turn the PC off until the system will be rebooted and the Status LED (green) of the printer turns on. Re-writing may will be impossible if writing procedure goes wrong. 5) After finishing rewriting, the system will be rebooted. Wait until Status LED (green) of the printer turns on. 7-15
-
 1
1 -
2
-
3
-
4
-
5
-
6
-
7
-
8
-
9
-
10
-
11
-
12
-
13
-
14
-
15
-
16
-
17
-
18
-
19
-
20
-
21
-
22
-
23
-
24
-
25
-
26
-
27
-
28
-
29
-
30
-
31
-
32
-
33
-
34
-
35
-
36
-
37
-
38
-
39
-
40
-
41
-
42
-
43
-
44
-
45
-
46
-
47
-
48
-
49
-
50
-
51
-
52
-
53
-
54
-
55
-
56
-
57
-
58
-
59
-
60
-
61
-
62
-
63
-
64
-
65
-
66
-
67
-
68
-
69
-
70
-
71
-
72
-
73
-
74
-
75
-
76
-
77
-
78
-
79
-
80
-
81
-
82
-
83
-
84
-
85
-
86
-
87
-
88
-
89
-
90
-
91
-
92
-
93
-
94
-
95
-
96
-
97
-
98
-
99
-
100
-
101
-
102
-
103
-
104
-
105
-
106
-
107
-
108
-
109
-
110
-
111
-
112
-
113
-
114
-
115
-
116
-
117
-
118
-
119
-
120
-
121
-
122
-
123
-
124
-
125
-
126
-
127
-
128
-
129
-
130
-
131
-
132
-
133
-
134
-
135
-
136
-
137
-
138
-
139
-
140
-
141
-
142
-
143
-
144
-
145
-
146
-
147
-
148
-
149
-
150
-
151
-
152
-
153
-
154
-
155
-
156
-
157
-
158
-
159
-
160
-
161
-
162
-
163
-
164
-
165
-
166
-
167
-
168
-
169
-
170
-
171
-
172
-
173
-
174
-
175
-
176
-
177
-
178
-
179
-
180
-
181
-
182
-
183
-
184
-
185
-
186
-
187
-
188
-
189
-
190
-
191
-
192
-
193
-
194
-
195
-
196
-
197
-
198
-
199
-
200
-
201
-
202
-
203
-
204
-
205
-
206
-
207
-
208
-
209
-
210
-
211
-
212
-
213
-
214
-
215
-
216
-
217
-
218
-
219
-
220
-
221
-
222
-
223
-
224
-
225
-
226
-
227
-
228
-
229
-
230
-
231
-
232
-
233
-
234
-
235
-
236
-
237
-
238
-
239
-
240
-
241
-
242
-
243
-
 244
244 -
 245
245 -
 246
246 -
 247
247 -
 248
248 -
 249
249 -
 250
250 -
 251
251 -
 252
252 -
 253
253 -
 254
254 -
255
-
256
-
257
-
258
-
259
-
260
-
261
-
262
-
263
-
264
-
265
 |
 |