Brother International HL-L8250CDN Users Guide - Page 118
Color Correction, Color Calibration
 |
View all Brother International HL-L8250CDN manuals
Add to My Manuals
Save this manual to your list of manuals |
Page 118 highlights
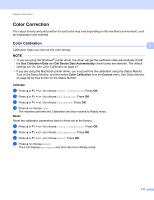
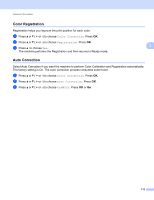
General Information Color Correction 3 The output density and print position for each color may vary depending on the machine's environment, such as temperature and humidity. Color Calibration Calibration helps you improve the color density. 3 3 NOTE • If you are using the Windows® printer driver, the driver will get the calibration data automatically if both the Use Calibration Data and Get Device Data Automatically check boxes are selected. The default settings are On. See Color Calibration on page 47. • If you are using the Macintosh printer driver, you must perform the calibration using the Status Monitor. Turn on the Status Monitor, and then select Color Calibration from the Control menu. See Status Monitor on page 82 for how to turn on the Status Monitor. Calibrate a Press a or b ( + or -) to choose Color Correction. Press OK. b Press a or b ( + or -) to choose Calibration. Press OK. c Press a or b ( + or -) to choose Calibrate. Press OK. d Press a to choose Yes. The machine performs the Calibration and then returns to Ready mode. Reset Reset the calibration parameters back to those set at the factory. a Press a or b ( + or -) to choose Color Correction. Press OK. b Press a or b ( + or -) to choose Calibration. Press OK. c Press a or b ( + or -) to choose Reset. Press OK. d Press a to choose Reset. The LCD displays Accepted and then returns to Ready mode. 111
-
 1
1 -
2
-
3
-
4
-
5
-
6
-
7
-
8
-
9
-
10
-
11
-
12
-
13
-
14
-
15
-
16
-
17
-
18
-
19
-
20
-
21
-
22
-
23
-
24
-
25
-
26
-
27
-
28
-
29
-
30
-
31
-
32
-
33
-
34
-
35
-
36
-
37
-
38
-
39
-
40
-
41
-
42
-
43
-
44
-
45
-
46
-
47
-
48
-
49
-
50
-
51
-
52
-
53
-
54
-
55
-
56
-
57
-
58
-
59
-
60
-
61
-
62
-
63
-
64
-
65
-
66
-
67
-
68
-
69
-
70
-
71
-
72
-
73
-
74
-
75
-
76
-
77
-
78
-
79
-
80
-
81
-
82
-
83
-
84
-
85
-
86
-
87
-
88
-
89
-
90
-
91
-
92
-
93
-
94
-
95
-
96
-
97
-
98
-
99
-
100
-
101
-
102
-
103
-
104
-
105
-
106
-
107
-
108
-
109
-
110
-
111
-
112
-
 113
113 -
 114
114 -
 115
115 -
 116
116 -
 117
117 -
 118
118 -
 119
119 -
 120
120 -
 121
121 -
 122
122 -
 123
123 -
124
-
125
-
126
-
127
-
128
-
129
-
130
-
131
-
132
-
133
-
134
-
135
-
136
-
137
-
138
-
139
-
140
-
141
-
142
-
143
-
144
-
145
-
146
-
147
-
148
-
149
-
150
-
151
-
152
-
153
-
154
-
155
-
156
-
157
-
158
-
159
-
160
-
161
-
162
-
163
-
164
-
165
-
166
-
167
-
168
-
169
-
170
-
171
-
172
-
173
-
174
-
175
-
176
-
177
-
178
-
179
-
180
-
181
-
182
-
183
-
184
-
185
-
186
-
187
-
188
-
189
-
190
-
191
-
192
-
193
-
194
-
195
-
196
-
197
-
198
-
199
-
200
-
201
-
202
-
203
-
204
-
205
-
206
-
207
-
208
-
209
-
210
-
211
-
212
-
213
-
214
-
215
-
216
-
217
-
218
-
219
-
220
-
221
-
222
-
223
 |
 |
