Brother International HL-L8250CDN Users Guide - Page 134
Make sure you installed the toner cartridge correctly or it may separate from the drum unit.
 |
View all Brother International HL-L8250CDN manuals
Add to My Manuals
Save this manual to your list of manuals |
Page 134 highlights
Routine Maintenance h Hold the handle of the toner cartridge and slide the toner cartridge into the drum unit then gently pull it toward you until you hear it lock into place. Make sure that you match the toner cartridge color to the same color label on the drum unit. Repeat this for all the toner cartridges. BK TN-BK BK BK TN-C C TN-M M TN-Y 5 Y BK - Black C - Cyan M - Magenta Y - Yellow NOTE Make sure you installed the toner cartridge correctly or it may separate from the drum unit. i Push the drum unit in until it stops. j Close the front cover of the machine. NOTE After replacing the toner cartridge, DO NOT turn off the machine's power switch or open the front cover until the LCD displays Ready. 127
-
 1
1 -
2
-
3
-
4
-
5
-
6
-
7
-
8
-
9
-
10
-
11
-
12
-
13
-
14
-
15
-
16
-
17
-
18
-
19
-
20
-
21
-
22
-
23
-
24
-
25
-
26
-
27
-
28
-
29
-
30
-
31
-
32
-
33
-
34
-
35
-
36
-
37
-
38
-
39
-
40
-
41
-
42
-
43
-
44
-
45
-
46
-
47
-
48
-
49
-
50
-
51
-
52
-
53
-
54
-
55
-
56
-
57
-
58
-
59
-
60
-
61
-
62
-
63
-
64
-
65
-
66
-
67
-
68
-
69
-
70
-
71
-
72
-
73
-
74
-
75
-
76
-
77
-
78
-
79
-
80
-
81
-
82
-
83
-
84
-
85
-
86
-
87
-
88
-
89
-
90
-
91
-
92
-
93
-
94
-
95
-
96
-
97
-
98
-
99
-
100
-
101
-
102
-
103
-
104
-
105
-
106
-
107
-
108
-
109
-
110
-
111
-
112
-
113
-
114
-
115
-
116
-
117
-
118
-
119
-
120
-
121
-
122
-
123
-
124
-
125
-
126
-
127
-
128
-
 129
129 -
 130
130 -
 131
131 -
 132
132 -
 133
133 -
 134
134 -
 135
135 -
 136
136 -
 137
137 -
 138
138 -
 139
139 -
140
-
141
-
142
-
143
-
144
-
145
-
146
-
147
-
148
-
149
-
150
-
151
-
152
-
153
-
154
-
155
-
156
-
157
-
158
-
159
-
160
-
161
-
162
-
163
-
164
-
165
-
166
-
167
-
168
-
169
-
170
-
171
-
172
-
173
-
174
-
175
-
176
-
177
-
178
-
179
-
180
-
181
-
182
-
183
-
184
-
185
-
186
-
187
-
188
-
189
-
190
-
191
-
192
-
193
-
194
-
195
-
196
-
197
-
198
-
199
-
200
-
201
-
202
-
203
-
204
-
205
-
206
-
207
-
208
-
209
-
210
-
211
-
212
-
213
-
214
-
215
-
216
-
217
-
218
-
219
-
220
-
221
-
222
-
223
 |
 |

Routine Maintenance
127
5
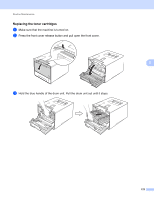
h
Hold the handle of the toner cartridge and slide the toner cartridge into the drum unit then gently pull it
toward you until you hear it lock into place. Make sure that you match the toner cartridge color to the
same color label on the drum unit. Repeat this for all the toner cartridges.
NOTE
Make sure you installed the toner cartridge correctly or it may separate from the drum unit.
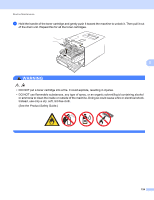
i
Push the drum unit in until it stops.
j
Close the front cover of the machine.
NOTE
After replacing the toner cartridge, DO NOT turn off the machine's power switch or open the front cover
until the LCD displays
Ready
.
BK - Black
C - Cyan
M - Magenta
Y - Yellow
BK
TN-BK
TN-C
TN-M
TN-Y
BK
BK
C
M
Y