Brother International MFC-J4410DW Software Users Manual - English - Page 173
Changing the default settings of a button, Configuring Scan button settings, Show Scanner Interface
 |
View all Brother International MFC-J4410DW manuals
Add to My Manuals
Save this manual to your list of manuals |
Page 173 highlights
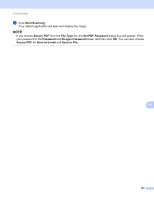
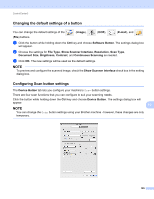
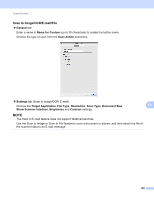
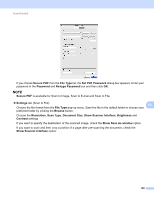
ControlCenter2 Changing the default settings of a button 10 You can change the default settings of the (Image), (OCR), (E-mail), and (File) buttons. a Click the button while holding down the Ctrl key and choose Software Button. The settings dialog box will appear. b Choose the settings for File Type, Show Scanner Interface, Resolution, Scan Type, Document Size, Brightness, Contrast, and Continuous Scanning as needed. c Click OK. The new settings will be used as the default settings. NOTE To preview and configure the scanned image, check the Show Scanner Interface check box in the setting dialog box. Configuring Scan button settings 10 The Device Button tab lets you configure your machine's Scan button settings. There are four scan functions that you can configure to suit your scanning needs. Click the button while holding down the Ctrl key and choose Device Button. The settings dialog box will appear. 10 NOTE You can change the Scan button settings using your Brother machine - however, these changes are only temporary. 165
-
 1
1 -
2
-
3
-
4
-
5
-
6
-
7
-
8
-
9
-
10
-
11
-
12
-
13
-
14
-
15
-
16
-
17
-
18
-
19
-
20
-
21
-
22
-
23
-
24
-
25
-
26
-
27
-
28
-
29
-
30
-
31
-
32
-
33
-
34
-
35
-
36
-
37
-
38
-
39
-
40
-
41
-
42
-
43
-
44
-
45
-
46
-
47
-
48
-
49
-
50
-
51
-
52
-
53
-
54
-
55
-
56
-
57
-
58
-
59
-
60
-
61
-
62
-
63
-
64
-
65
-
66
-
67
-
68
-
69
-
70
-
71
-
72
-
73
-
74
-
75
-
76
-
77
-
78
-
79
-
80
-
81
-
82
-
83
-
84
-
85
-
86
-
87
-
88
-
89
-
90
-
91
-
92
-
93
-
94
-
95
-
96
-
97
-
98
-
99
-
100
-
101
-
102
-
103
-
104
-
105
-
106
-
107
-
108
-
109
-
110
-
111
-
112
-
113
-
114
-
115
-
116
-
117
-
118
-
119
-
120
-
121
-
122
-
123
-
124
-
125
-
126
-
127
-
128
-
129
-
130
-
131
-
132
-
133
-
134
-
135
-
136
-
137
-
138
-
139
-
140
-
141
-
142
-
143
-
144
-
145
-
146
-
147
-
148
-
149
-
150
-
151
-
152
-
153
-
154
-
155
-
156
-
157
-
158
-
159
-
160
-
161
-
162
-
163
-
164
-
165
-
166
-
167
-
 168
168 -
 169
169 -
 170
170 -
 171
171 -
 172
172 -
 173
173 -
 174
174 -
 175
175 -
 176
176 -
 177
177 -
 178
178 -
179
-
180
-
181
-
182
-
183
-
184
-
185
-
186
-
187
-
188
-
189
-
190
-
191
-
192
-
193
-
194
-
195
-
196
-
197
-
198
-
199
-
200
-
201
-
202
-
203
-
204
-
205
-
206
-
207
-
208
-
209
-
210
-
211
-
212
-
213
-
214
-
215
-
216
-
217
-
218
-
219
-
220
-
221
-
222
 |
 |