Brother International MFC-J4410DW Software Users Manual - English - Page 70
Opening the folder tree, Printing images, Attaching images to E-mail, Color / Grayscale
 |
View all Brother International MFC-J4410DW manuals
Add to My Manuals
Save this manual to your list of manuals |
Page 70 highlights
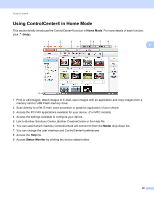
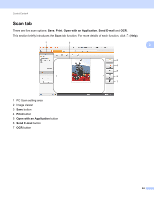
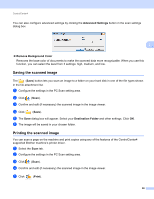
ControlCenter4 Opening the folder tree 3 The Desktop button lets you open the folder tree from the desktop to choose images you want to print, edit, attach to an E-mail or open with a specific application directly. Printing images The (Print) button lets you print images. 3 3 a Choose images you want to print by clicking the image from the image viewer, check the check box under the image, and then enter the number of copies you want to print (1 to 99). b Click (Print). The print setting window will appear. c Configure the settings for Paper Size, Media Type and Layout. d Click Properties to configure Print Quality, Color / Grayscale and Color Mode if necessary. NOTE If you want to print the image timestamp in the lower-right corner of the image, check the Print Date check box. e Click OK. f Click (Start Printing). Editing images 3 The (Edit) button lets you edit images with various functions. a Choose images you want to edit by clicking the image from the image viewer. b Click (Edit). The edit window will appear. c Edit the images with Trimming, Image Correction and Image Enhancement functions. d Click (Save). Attaching images to E-mail 3 The (Send E-mail) button lets you attach images to your default E-mail application. 62
-
 1
1 -
2
-
3
-
4
-
5
-
6
-
7
-
8
-
9
-
10
-
11
-
12
-
13
-
14
-
15
-
16
-
17
-
18
-
19
-
20
-
21
-
22
-
23
-
24
-
25
-
26
-
27
-
28
-
29
-
30
-
31
-
32
-
33
-
34
-
35
-
36
-
37
-
38
-
39
-
40
-
41
-
42
-
43
-
44
-
45
-
46
-
47
-
48
-
49
-
50
-
51
-
52
-
53
-
54
-
55
-
56
-
57
-
58
-
59
-
60
-
61
-
62
-
63
-
64
-
 65
65 -
 66
66 -
 67
67 -
 68
68 -
 69
69 -
 70
70 -
 71
71 -
 72
72 -
 73
73 -
 74
74 -
 75
75 -
76
-
77
-
78
-
79
-
80
-
81
-
82
-
83
-
84
-
85
-
86
-
87
-
88
-
89
-
90
-
91
-
92
-
93
-
94
-
95
-
96
-
97
-
98
-
99
-
100
-
101
-
102
-
103
-
104
-
105
-
106
-
107
-
108
-
109
-
110
-
111
-
112
-
113
-
114
-
115
-
116
-
117
-
118
-
119
-
120
-
121
-
122
-
123
-
124
-
125
-
126
-
127
-
128
-
129
-
130
-
131
-
132
-
133
-
134
-
135
-
136
-
137
-
138
-
139
-
140
-
141
-
142
-
143
-
144
-
145
-
146
-
147
-
148
-
149
-
150
-
151
-
152
-
153
-
154
-
155
-
156
-
157
-
158
-
159
-
160
-
161
-
162
-
163
-
164
-
165
-
166
-
167
-
168
-
169
-
170
-
171
-
172
-
173
-
174
-
175
-
176
-
177
-
178
-
179
-
180
-
181
-
182
-
183
-
184
-
185
-
186
-
187
-
188
-
189
-
190
-
191
-
192
-
193
-
194
-
195
-
196
-
197
-
198
-
199
-
200
-
201
-
202
-
203
-
204
-
205
-
206
-
207
-
208
-
209
-
210
-
211
-
212
-
213
-
214
-
215
-
216
-
217
-
218
-
219
-
220
-
221
-
222
 |
 |