Brother International MFC-J4410DW Software Users Manual - English - Page 191
Scan to OCR
 |
View all Brother International MFC-J4410DW manuals
Add to My Manuals
Save this manual to your list of manuals |
Page 191 highlights
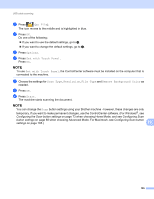
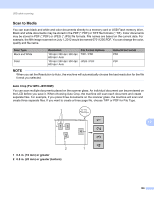
USB cable scanning g Press Set with Touch Panel. Press On. NOTE To use Set with Touch Panel, the ControlCenter software must be installed on the computer that is connected to the machine. h Choose the settings for Scan Type, Resolution, File Type and Remove Background Color as needed. i Press OK. j Press Start. The machine starts scanning the document. NOTE You can change the Scan button settings using your Brother machine - however, these changes are only temporary. If you want to make permanent changes, use the ControlCenter software. (For Windows®, see Configuring the Scan button settings on page 73 when choosing Home Mode, and see Configuring Scan button settings on page 88 when choosing Advanced Mode. For Macintosh, see Configuring Scan button settings on page 165.) Scan to OCR 12 If your original document is text, you can use Nuance™ PaperPort™ 12SE or Presto! PageManager to scan the document and convert it into a text file which can then be edited using a word processing application of your choice. For MFC-J4510DW a Load your document. 12 12 b Press (Scan). c Swipe left or right to display (to OCR). d Press (to OCR). The icon moves to the middle and is highlighted in blue. e Press OK. Do one of the following: If you want to use the default settings, go to j. If you want to change the default settings, go to f. f Press Options. 183
-
 1
1 -
2
-
3
-
4
-
5
-
6
-
7
-
8
-
9
-
10
-
11
-
12
-
13
-
14
-
15
-
16
-
17
-
18
-
19
-
20
-
21
-
22
-
23
-
24
-
25
-
26
-
27
-
28
-
29
-
30
-
31
-
32
-
33
-
34
-
35
-
36
-
37
-
38
-
39
-
40
-
41
-
42
-
43
-
44
-
45
-
46
-
47
-
48
-
49
-
50
-
51
-
52
-
53
-
54
-
55
-
56
-
57
-
58
-
59
-
60
-
61
-
62
-
63
-
64
-
65
-
66
-
67
-
68
-
69
-
70
-
71
-
72
-
73
-
74
-
75
-
76
-
77
-
78
-
79
-
80
-
81
-
82
-
83
-
84
-
85
-
86
-
87
-
88
-
89
-
90
-
91
-
92
-
93
-
94
-
95
-
96
-
97
-
98
-
99
-
100
-
101
-
102
-
103
-
104
-
105
-
106
-
107
-
108
-
109
-
110
-
111
-
112
-
113
-
114
-
115
-
116
-
117
-
118
-
119
-
120
-
121
-
122
-
123
-
124
-
125
-
126
-
127
-
128
-
129
-
130
-
131
-
132
-
133
-
134
-
135
-
136
-
137
-
138
-
139
-
140
-
141
-
142
-
143
-
144
-
145
-
146
-
147
-
148
-
149
-
150
-
151
-
152
-
153
-
154
-
155
-
156
-
157
-
158
-
159
-
160
-
161
-
162
-
163
-
164
-
165
-
166
-
167
-
168
-
169
-
170
-
171
-
172
-
173
-
174
-
175
-
176
-
177
-
178
-
179
-
180
-
181
-
182
-
183
-
184
-
185
-
 186
186 -
 187
187 -
 188
188 -
 189
189 -
 190
190 -
 191
191 -
 192
192 -
 193
193 -
 194
194 -
 195
195 -
 196
196 -
197
-
198
-
199
-
200
-
201
-
202
-
203
-
204
-
205
-
206
-
207
-
208
-
209
-
210
-
211
-
212
-
213
-
214
-
215
-
216
-
217
-
218
-
219
-
220
-
221
-
222
 |
 |
