Brother International PEDESIGN PLUS Users Manual - English - Page 16
Step 3, Step 4
 |
View all Brother International PEDESIGN PLUS manuals
Add to My Manuals
Save this manual to your list of manuals |
Page 16 highlights
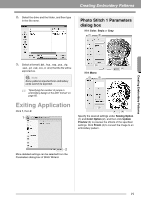
Creating Embroidery Patterns Step 3 Adding text and setting character spacing 1. Click , then . 7. Click the Text Attributes tab, and then set Character Spacing (1) to 3.0 mm. 2. Click below the girl in the Design Page. 1 A vertical dashed line will appear on the Design Page. 3. From the keyboard, type in "Andrea". Specify the setting by clicking the selector and typing in the value, or by clicking or . Step 4 Transforming the text 4. Press the Enter key. The text is entered. 5. Click the text to select it. 6. Click the Color tab, and then click 1 to change the color of the font. 1. Click the text to select it, select the Transform check box (1), and then click 2. 1 2 1 14
-
 1
1 -
2
-
3
-
4
-
5
-
6
-
7
-
8
-
9
-
10
-
 11
11 -
 12
12 -
 13
13 -
 14
14 -
 15
15 -
 16
16 -
 17
17 -
 18
18 -
 19
19 -
 20
20 -
 21
21 -
22
-
23
-
24
-
25
-
26
-
27
-
28
-
29
-
30
-
31
-
32
-
33
-
34
-
35
-
36
-
37
-
38
-
39
-
40
-
41
-
42
-
43
-
44
-
45
-
46
-
47
-
48
-
49
-
50
-
51
-
52
-
53
-
54
-
55
-
56
-
57
-
58
-
59
-
60
-
61
-
62
-
63
-
64
-
65
-
66
-
67
-
68
-
69
-
70
-
71
-
72
-
73
-
74
-
75
-
76
-
77
-
78
-
79
-
80
 |
 |

14
Creating Embroidery Patterns
Step 3
Adding text and setting
character spacing
1.
Click
, then
.
2.
Click below the girl in the Design Page.
A vertical dashed line will appear on the
Design Page.
3.
From the keyboard, type in “Andrea”.
4.
Press the
key.
The text is entered.
5.
Click the text to select it.
6.
Click the
Color
tab, and then click
1
to change
the color of the font.
7.
Click the
Text Attributes
tab, and then set
Character Spacing
(
1
) to
3.0 mm
.
Specify the setting by clicking the selector and
typing in the value, or by clicking
or
.
Step 4
Transforming the text
1.
Click the text to select it, select the
Transform
check box (
1
), and then click
2
.
Enter
1
1
1
2