Brother International PEDESIGN PLUS Users Manual - English - Page 52
From an embroidery card
 |
View all Brother International PEDESIGN PLUS manuals
Add to My Manuals
Save this manual to your list of manuals |
Page 52 highlights
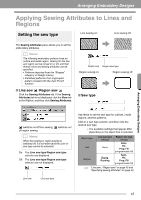
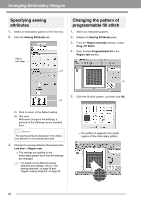
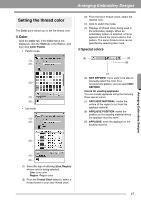
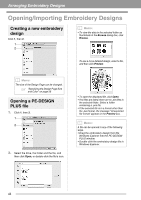
Arranging Embroidery Designs 3. Select a folder, and then click OK. ■ From an embroidery card 1. Insert an embroidery card into the USB Card Writer Module. c Refer to "Transferring to a machine by using an original card" on page 52 2. Click then , then , . 4. From the File Type box, select a file name extension to display the corresponding embroidery data. 5. Select the file icon, and then click Import. The file is imported. a Note: When importing designs from other vendors, be sure to choose a design that will fit in the Design Page. b Memo: Since .dst files do not contain thread color information, the colors of an imported .dst file may not appear as expected. You can change the thread colors by using functions in the Sewing Order pane. c "Changing colors" on page 44 c "Specifying the number of jumps in embroidery design of the DST format" on page 60. After the card has been read, the embroidery designs on the card are displayed. 3. Select the file icon, and then click Import. The file is imported. a Note: Due to copyright issues, some embroidery cards cannot be used with this function. 50
-
 1
1 -
2
-
3
-
4
-
5
-
6
-
7
-
8
-
9
-
10
-
11
-
12
-
13
-
14
-
15
-
16
-
17
-
18
-
19
-
20
-
21
-
22
-
23
-
24
-
25
-
26
-
27
-
28
-
29
-
30
-
31
-
32
-
33
-
34
-
35
-
36
-
37
-
38
-
39
-
40
-
41
-
42
-
43
-
44
-
45
-
46
-
 47
47 -
 48
48 -
 49
49 -
 50
50 -
 51
51 -
 52
52 -
 53
53 -
 54
54 -
 55
55 -
 56
56 -
 57
57 -
58
-
59
-
60
-
61
-
62
-
63
-
64
-
65
-
66
-
67
-
68
-
69
-
70
-
71
-
72
-
73
-
74
-
75
-
76
-
77
-
78
-
79
-
80
 |
 |
