Brother International PEDESIGN PLUS Users Manual - English - Page 40
Scaling patterns, Rotating patterns
 |
View all Brother International PEDESIGN PLUS manuals
Add to My Manuals
Save this manual to your list of manuals |
Page 40 highlights
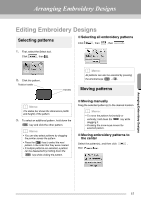
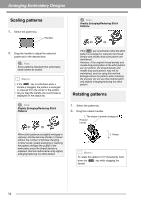
Arranging Embroidery Designs Scaling patterns 1. Select the pattern(s). Handles a Note: Greatly Enlarging/Reducing Stitch Patterns 2. Drag the handle to adjust the selected pattern(s) to the desired size. a Note: Some patterns imported from embroidery cards cannot be scaled. b Memo: • If the Shift key is held down while a handle is dragged, the pattern is enlarged or reduced from the center of the pattern. • As you drag the handle, the current size is displayed on the status bar. a Note: Slightly Enlarging/Reducing Stitch Patterns If the Ctrl key is held down while the stitch pattern is enlarged or reduced, the thread density and needle drop point pattern are maintained. However, if the original thread density and needle drop point pattern in the stitch pattern are not uniform, the thread density and needle drop point pattern may not be maintained, even by using this method. Enlarge/reduce the pattern while checking the preview. Do not use this method when only slightly enlarging/reducing the stitch pattern. Rotating patterns 1. Select the pattern(s). 2. Drag the rotation handle. 1. The shape of pointer changes to Rotation handle When stitch patterns are slightly enlarged or reduced, stitches become thicker or thinner without the number of stitches changing. In other words, greatly enlarging or reducing the pattern changes the quality of the embroidery since the thread density is adjusted. Use this method when only slightly enlarging/reducing the stitch pattern. 2. Rotate b Memo: To rotate the pattern in 15° increments, hold down the Shift key while dragging the handle. 38
-
 1
1 -
2
-
3
-
4
-
5
-
6
-
7
-
8
-
9
-
10
-
11
-
12
-
13
-
14
-
15
-
16
-
17
-
18
-
19
-
20
-
21
-
22
-
23
-
24
-
25
-
26
-
27
-
28
-
29
-
30
-
31
-
32
-
33
-
34
-
 35
35 -
 36
36 -
 37
37 -
 38
38 -
 39
39 -
 40
40 -
 41
41 -
 42
42 -
 43
43 -
 44
44 -
 45
45 -
46
-
47
-
48
-
49
-
50
-
51
-
52
-
53
-
54
-
55
-
56
-
57
-
58
-
59
-
60
-
61
-
62
-
63
-
64
-
65
-
66
-
67
-
68
-
69
-
70
-
71
-
72
-
73
-
74
-
75
-
76
-
77
-
78
-
79
-
80
 |
 |
