Brother International PEDESIGN PLUS Users Manual - English - Page 33
Set Output Size dialog box, Gray Balance / Set Output Size, dialog box
 |
View all Brother International PEDESIGN PLUS manuals
Add to My Manuals
Save this manual to your list of manuals |
Page 33 highlights
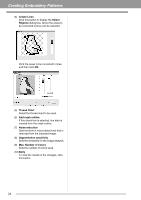
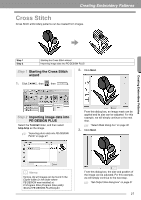
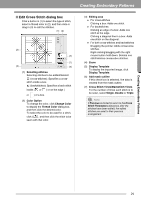
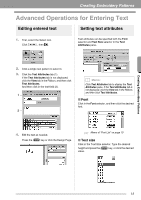
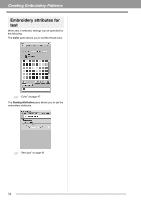
Creating Embroidery Patterns (3) If Auto Generate was clicked, is selected and an outline of mask was automatically detected from the image. The Auto Generate button is available only with images that have a light-colored background, like in this photo. ■ Set Output Size dialog box If Color, Sepia or Gray was selected for Photo Stitch 1, Photo Stitch 2 or Cross Stitch, or if Auto Punch was selected: The following dialog box appears. Embroidery pattern size (4) Zoom (5) Clicking the Image Tune button displays an Image Tune dialog box. Settings for Sharpness, Brightness and Contrast can be selected with the sliders. Adjust the position and size of the image, and then click Next to continue to the next step. • Drag the image to the desired position. • Drag the handle to adjust the image to the desired size. b Memo: Click Fit to Page to adjust the image to the size of the Design Page. ■ Gray Balance / Set Output Size dialog box If Mono was selected for Photo Stitch 1 or Photo Stitch 2: The following dialog box appears. Creating Embroidery Patterns (6) To exit the Stitch Wizard, close the Select Mask dialog box. To select a different image, click Cancel, and then repeat the procedure, starting by selecting a conversion method. Embroidery pattern size (1) Adjust the position and size of the image and the gray balance, and then click Next to continue to the next step. • Drag the image to the desired position. • Drag the handle to adjust the image to the desired size. • Drag the slider (1) to adjust the gray balance. 31
-
 1
1 -
2
-
3
-
4
-
5
-
6
-
7
-
8
-
9
-
10
-
11
-
12
-
13
-
14
-
15
-
16
-
17
-
18
-
19
-
20
-
21
-
22
-
23
-
24
-
25
-
26
-
27
-
 28
28 -
 29
29 -
 30
30 -
 31
31 -
 32
32 -
 33
33 -
 34
34 -
 35
35 -
 36
36 -
 37
37 -
 38
38 -
39
-
40
-
41
-
42
-
43
-
44
-
45
-
46
-
47
-
48
-
49
-
50
-
51
-
52
-
53
-
54
-
55
-
56
-
57
-
58
-
59
-
60
-
61
-
62
-
63
-
64
-
65
-
66
-
67
-
68
-
69
-
70
-
71
-
72
-
73
-
74
-
75
-
76
-
77
-
78
-
79
-
80
 |
 |
