Brother International PEDESIGN PLUS Users Manual - English - Page 48
Specifying sewing, attributes, Changing the pattern of, programmable fill stitch
 |
View all Brother International PEDESIGN PLUS manuals
Add to My Manuals
Save this manual to your list of manuals |
Page 48 highlights
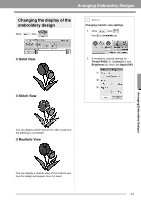
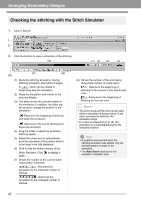
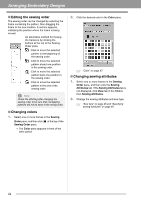
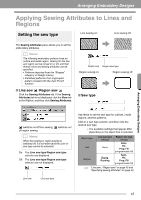
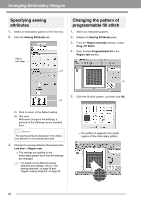
Arranging Embroidery Designs Specifying sewing attributes 1. Select an embroidery pattern or the Text tool. 2. Click the Sewing Attributes tab. Adjust with slider. Changing the pattern of programmable fill stitch 1. Select an embroidery pattern. 2. Display the Sewing Attributes pane. 3. From the Region sew type selector, select Prog. Fill Stitch. 4. Click 1 below Programmable fill in the Region sew section. (1) (1) 5. Click the fill stitch pattern, and then click OK. (2) (1) Click to return to the default setting. (2) Hint view With each change in the settings, a preview of the stitching can be checked here. b Memo: The sewing attributes displayed in the dialog box depend on the selected sew type. 3. Change the sewing attributes displayed under Line sew or Region sew. The settings are applied to the embroidery pattern each time the settings are changed. c For details on the different sewing attributes and settings, refer to "Line sewing attributes" on page 68 and "Region sewing attributes" on page 69. The pattern is applied to the inside regions of the embroidery pattern. 46
-
 1
1 -
2
-
3
-
4
-
5
-
6
-
7
-
8
-
9
-
10
-
11
-
12
-
13
-
14
-
15
-
16
-
17
-
18
-
19
-
20
-
21
-
22
-
23
-
24
-
25
-
26
-
27
-
28
-
29
-
30
-
31
-
32
-
33
-
34
-
35
-
36
-
37
-
38
-
39
-
40
-
41
-
42
-
 43
43 -
 44
44 -
 45
45 -
 46
46 -
 47
47 -
 48
48 -
 49
49 -
 50
50 -
 51
51 -
 52
52 -
 53
53 -
54
-
55
-
56
-
57
-
58
-
59
-
60
-
61
-
62
-
63
-
64
-
65
-
66
-
67
-
68
-
69
-
70
-
71
-
72
-
73
-
74
-
75
-
76
-
77
-
78
-
79
-
80
 |
 |
