Brother International PEDESIGN PLUS Users Manual - English - Page 46
Editing the sewing order, Changing colors, Changing sewing attributes
 |
View all Brother International PEDESIGN PLUS manuals
Add to My Manuals
Save this manual to your list of manuals |
Page 46 highlights
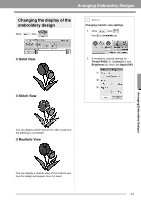
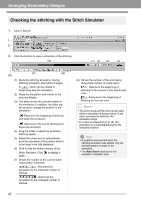
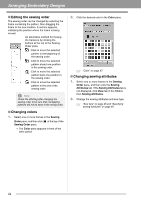
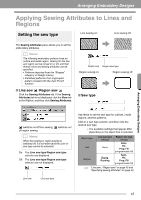
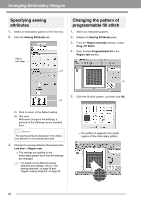
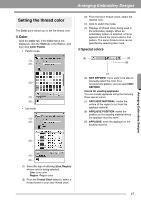
Arranging Embroidery Designs ■ Editing the sewing order The sewing order can be changed by selecting the frame containing the pattern, then dragging the frame to the new location. A red line appears, indicating the position where the frame is being moved. An alternative method for moving the frames is by clicking the buttons at the top of the Sewing Order pane. :Click to move the selected pattern to the beginning of the sewing order. :Click to move the selected pattern ahead one position in the sewing order. :Click to move the selected pattern back one position in the sewing order. :Click to move the selected pattern to the end of the sewing order. a Note: Check the stitching after changing the sewing order to be sure that overlapping patterns will not be sewn in the wrong order. ■ Changing colors 1. Select one or more frames in the Sewing Order pane, and then click at the top of the Sewing Order pane. The Color pane appears in front of the other panes. 2. Click the desired color in the Color pane. c "Color" on page 47. ■ Changing sewing attributes 1. Select one or more frames in the Sewing Order pane, and then click the Sewing Attributes tab. If the Sewing Attributes tab is not displayed, click View tab in the Ribbon, then Sewing Attributes. 2. Change the sewing attributes and sew type. c "Sew type" on page 45 and "Specifying sewing attributes" on page 46 44
-
 1
1 -
2
-
3
-
4
-
5
-
6
-
7
-
8
-
9
-
10
-
11
-
12
-
13
-
14
-
15
-
16
-
17
-
18
-
19
-
20
-
21
-
22
-
23
-
24
-
25
-
26
-
27
-
28
-
29
-
30
-
31
-
32
-
33
-
34
-
35
-
36
-
37
-
38
-
39
-
40
-
 41
41 -
 42
42 -
 43
43 -
 44
44 -
 45
45 -
 46
46 -
 47
47 -
 48
48 -
 49
49 -
 50
50 -
 51
51 -
52
-
53
-
54
-
55
-
56
-
57
-
58
-
59
-
60
-
61
-
62
-
63
-
64
-
65
-
66
-
67
-
68
-
69
-
70
-
71
-
72
-
73
-
74
-
75
-
76
-
77
-
78
-
79
-
80
 |
 |
