Brother International PT-2030 Users Manual - English - Page 38
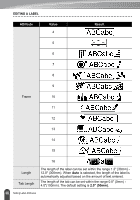
Templates, Attribute, Value, Details
 |
UPC - 012502628033
View all Brother International PT-2030 manuals
Add to My Manuals
Save this manual to your list of manuals |
Page 38 highlights
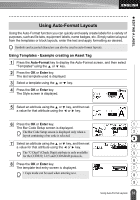
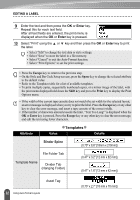
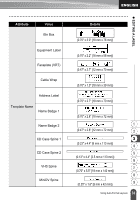
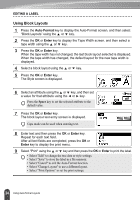
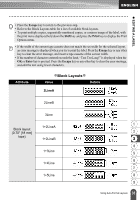
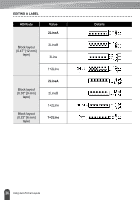
EDITING A LABEL 9 Enter the text and then press the OK or Enter key. Repeat this for each text field. After all text fields are entered, the print menu is displayed when the OK or Enter key is pressed. 10 Select "Print" using the or key and then press the OK or Enter key to print the label. • Select "Edit" to change the text data or style settings. • Select "Save" to store the label in a file memory. • Select "Cancel" to exit the Auto-Format function. • Select "Print Options" to set the print settings. • Press the Escape key to return to the previous step. • On the Style and Bar Code Setup screens, press the Space key to change the selected attribute to the default value. • Refer to the Templates table for a list of available templates. • To print multiple copies, sequentially numbered copies, or a mirror image of the label, with the print menu displayed hold down the Shift key and press the Print key to display the Print Options menu. • If the width of the current tape cassette does not match the set width for the selected layout, an error message is displayed when you try to print the label. Press the Escape key or any other key to clear the error message, and insert a tape cassette of the correct width. • If the number of characters entered exceeds the limit, "Text Too Long!" is displayed when the OK or Enter key is pressed. Press the Escape key or any other key to clear the error message, and edit the text using fewer characters. Attribute zTemplatesz Value Details Binder Spine (0.70" x 8.6" [18mm x 219mm]) File Folder Tab Template Name Divider Tab (Hanging Folder) (0.47" x 3.2" [12 mm x 82 mm]) (0.47" x 1.6" [12 mm x 42 mm]) Asset Tag 32 Using Auto-Format Layouts (0.70" x 2.7" [18 mm x 70 mm])
-
 1
1 -
2
-
3
-
4
-
5
-
6
-
7
-
8
-
9
-
10
-
11
-
12
-
13
-
14
-
15
-
16
-
17
-
18
-
19
-
20
-
21
-
22
-
23
-
24
-
25
-
26
-
27
-
28
-
29
-
30
-
31
-
32
-
 33
33 -
 34
34 -
 35
35 -
 36
36 -
 37
37 -
 38
38 -
 39
39 -
 40
40 -
 41
41 -
 42
42 -
 43
43 -
44
-
45
-
46
-
47
-
48
-
49
-
50
-
51
-
52
-
53
-
54
-
55
-
56
-
57
-
58
-
59
-
60
-
61
-
62
-
63
-
64
-
65
-
66
-
67
-
68
 |
 |
