Brother International PT-2030 Users Manual - English - Page 51
Setting Margin, Tape Cutting Options - waste tape
 |
UPC - 012502628033
View all Brother International PT-2030 manuals
Add to My Manuals
Save this manual to your list of manuals |
Page 51 highlights
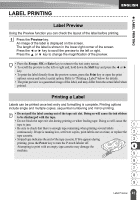
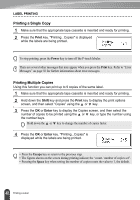
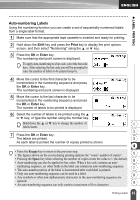
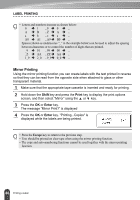
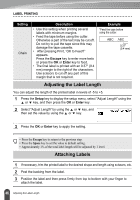
z LABEL PRINTING Setting Margin The tape cutting options allow you to specify how the tape is fed and cut when printing labels. In particular, the "Chain" options greatly reduce the amount of wasted tape by using smaller margins and eliminating blank sections cut between labels. 1 Press the Label key to display the Label menu. 2 Select "Margin" using the or key, and then set the value by using the or key. 3 Press the OK or Enter key to apply the settings. New settings are NOT applied if you do not press the OK or Enter key. • Press the Escape key to return to the previous step. • Refer to the Tape Cutting table for a list of all available settings. Setting zTape Cutting Optionsz Description Example Full Each label is printed, leaving a margin of 0.98" (25 mm) on each end. 0.98" (25 mm) ABC 0.98" (25 mm) • A margin of 0.98" (25 mm) is printed first, 0.98" (25 mm) 1 and then each label is printed, leaving a margin of 0.47" (12 mm) before and after Half the text. • Dots (:) are printed in front of the text. Cut along the printed dots (:) with scissors. : ABC 2 0.47" 0.47" 3 (12 mm) (12 mm) 4 • A margin of 0.98" (25 mm) is printed first, 0.98" (25 mm) 5 and then each label is printed, leaving a margin of 0.16" (4 mm) before and after the : ABC 6 Narrow text. • Dots (:) are printed in front of the text. Cut 0.16" 0.16" 7 along the printed dots (:) with scissors. (4 mm) (4 mm) 8 9 45 Setting Margin
-
 1
1 -
2
-
3
-
4
-
5
-
6
-
7
-
8
-
9
-
10
-
11
-
12
-
13
-
14
-
15
-
16
-
17
-
18
-
19
-
20
-
21
-
22
-
23
-
24
-
25
-
26
-
27
-
28
-
29
-
30
-
31
-
32
-
33
-
34
-
35
-
36
-
37
-
38
-
39
-
40
-
41
-
42
-
43
-
44
-
45
-
 46
46 -
 47
47 -
 48
48 -
 49
49 -
 50
50 -
 51
51 -
 52
52 -
 53
53 -
 54
54 -
 55
55 -
 56
56 -
57
-
58
-
59
-
60
-
61
-
62
-
63
-
64
-
65
-
66
-
67
-
68
 |
 |