Brother International PT-9500PC Quick Setup Guide - English and Spanish - Page 100
Auto Tape Cut, Multi Half Cut
 |
UPC - 012502607267
View all Brother International PT-9500PC manuals
Add to My Manuals
Save this manual to your list of manuals |
Page 100 highlights
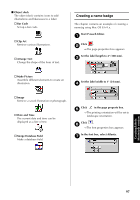
Specify the printing options. 2 ■ Setting the printing options and label printing (Mac OS X 10.1 or later) Click . 1 →The print dialog box appears. Click "Copies & Pages", and then select 2 the items to change. " Pages The printing range is specified by page. " Auto Tape Cut The printed labels are cut and then ejected. " Multi Half Cut Only the label tape is cut without cutting the backing, making it easier to remove the label backing. " Chain Printing The printed label will remain in the printer without being ejected until the next label is printed. Extra space is not inserted between the labels. To discharge the label, press the feed/cut button. " Mirror printing A mirror image of the data is printed. This is very convenient for affixing to the inner surface of glass. Use clear tape. " Numbering When numbering (consecutive numbers) is set for labels, the number that appears in the label can be set to increase by a specified amount on each successive label. Click [Print]. 3 →The label will be printed. Specify the printing options. 3 " Copies & Pages Copies: Specify the number of copies of the label to print. " Layout Specify the label layout. Creating labels: Macintosh version 99
-
 1
1 -
2
-
3
-
4
-
5
-
6
-
7
-
8
-
9
-
10
-
11
-
12
-
13
-
14
-
15
-
16
-
17
-
18
-
19
-
20
-
21
-
22
-
23
-
24
-
25
-
26
-
27
-
28
-
29
-
30
-
31
-
32
-
33
-
34
-
35
-
36
-
37
-
38
-
39
-
40
-
41
-
42
-
43
-
44
-
45
-
46
-
47
-
48
-
49
-
50
-
51
-
52
-
53
-
54
-
55
-
56
-
57
-
58
-
59
-
60
-
61
-
62
-
63
-
64
-
65
-
66
-
67
-
68
-
69
-
70
-
71
-
72
-
73
-
74
-
75
-
76
-
77
-
78
-
79
-
80
-
81
-
82
-
83
-
84
-
85
-
86
-
87
-
88
-
89
-
90
-
91
-
92
-
93
-
94
-
 95
95 -
 96
96 -
 97
97 -
 98
98 -
 99
99 -
 100
100 -
 101
101 -
 102
102 -
 103
103 -
 104
104 -
 105
105 -
106
-
107
-
108
-
109
-
110
-
111
-
112
-
113
-
114
-
115
-
116
-
117
-
118
-
119
-
120
-
121
-
122
-
123
-
124
-
125
-
126
-
127
-
128
-
129
-
130
-
131
-
132
-
133
-
134
-
135
-
136
-
137
-
138
-
139
-
140
-
141
-
142
-
143
-
144
-
145
-
146
-
147
-
148
-
149
-
150
-
151
-
152
-
153
-
154
-
155
-
156
-
157
-
158
-
159
-
160
-
161
-
162
-
163
-
164
-
165
-
166
-
167
-
168
-
169
-
170
-
171
-
172
-
173
-
174
-
175
-
176
-
177
-
178
-
179
-
180
-
181
-
182
-
183
-
184
-
185
-
186
-
187
-
188
-
189
-
190
-
191
-
192
-
193
-
194
-
195
-
196
-
197
-
198
-
199
-
200
-
201
-
202
-
203
-
204
-
205
-
206
-
207
-
208
-
209
-
210
-
211
-
212
-
213
-
214
-
215
-
216
-
217
-
218
-
219
-
220
-
221
-
222
-
223
-
224
-
225
-
226
-
227
-
228
-
229
-
230
-
231
-
232
-
233
-
234
-
235
-
236
-
237
-
238
-
239
-
240
-
241
-
242
-
243
-
244
-
245
-
246
-
247
-
248
-
249
-
250
-
251
-
252
-
253
-
254
 |
 |
