Brother International PT-9500PC Quick Setup Guide - English and Spanish - Page 86
Right-click in the P-touch Quick Editor, Minimizing P-touch Quick Editor
 |
UPC - 012502607267
View all Brother International PT-9500PC manuals
Add to My Manuals
Save this manual to your list of manuals |
Page 86 highlights
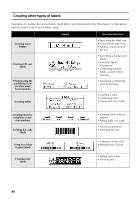
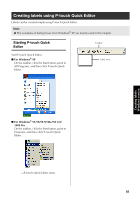
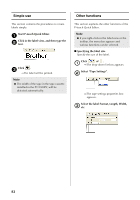
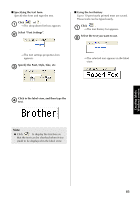
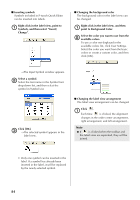
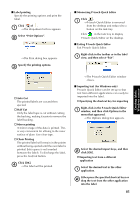
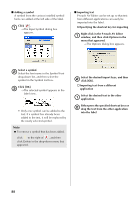
■ Label printing Specify the printing options and print the label. Click of . 1 →The drop-down list box appears. Select "Print Options". 2 →The Print dialog box appears. Specify the printing options. 3 " Auto Cut The printed labels are cut and then ejected. " Half Cut Only the label tape is cut without cutting the backing, making it easier to remove the label backing. " Mirror printing A mirror image of the data is printed. This is very convenient for affixing to the inner surface of glass. Use clear tape. " Chain Printing The printed label will remain in the printer without being ejected until the next label is printed. Extra space is not inserted between the labels. To discharge the label, press the feed/cut button. Click [OK]. 4 →The label will be printed. ■ Minimizing P-touch Quick Editor Click . 1 →P-touch Quick Editor is removed from the desktop and reduced to a button on the task tray. Click in the task tray to display P-touch Quick Editor on the desktop. ■ Exiting P-touch Quick Editor Exit P-touch Quick Editor. Right-click in the toolbar or in the label 1 view, and then select "Exit". →The P-touch Quick Editor window closes. ■ Importing text (for Windows only) P-touch Quick Editor can be set up so that text from different applications can easily be imported into the label. " Specifying the shortcut key for importing Right-click in the P-touch Quick Editor 1 window, and then click Options in the menu that appeared. →The Options dialog box appears. Select the desired import keys, and then 2 click [OK]. " Importing text from a different application Select the desired text in the other 1 application. Either press the specified shortcut keys or 2 drag the text from the other application into the label. 85 Creating labels: Windows version
-
 1
1 -
2
-
3
-
4
-
5
-
6
-
7
-
8
-
9
-
10
-
11
-
12
-
13
-
14
-
15
-
16
-
17
-
18
-
19
-
20
-
21
-
22
-
23
-
24
-
25
-
26
-
27
-
28
-
29
-
30
-
31
-
32
-
33
-
34
-
35
-
36
-
37
-
38
-
39
-
40
-
41
-
42
-
43
-
44
-
45
-
46
-
47
-
48
-
49
-
50
-
51
-
52
-
53
-
54
-
55
-
56
-
57
-
58
-
59
-
60
-
61
-
62
-
63
-
64
-
65
-
66
-
67
-
68
-
69
-
70
-
71
-
72
-
73
-
74
-
75
-
76
-
77
-
78
-
79
-
80
-
 81
81 -
 82
82 -
 83
83 -
 84
84 -
 85
85 -
 86
86 -
 87
87 -
 88
88 -
 89
89 -
 90
90 -
 91
91 -
92
-
93
-
94
-
95
-
96
-
97
-
98
-
99
-
100
-
101
-
102
-
103
-
104
-
105
-
106
-
107
-
108
-
109
-
110
-
111
-
112
-
113
-
114
-
115
-
116
-
117
-
118
-
119
-
120
-
121
-
122
-
123
-
124
-
125
-
126
-
127
-
128
-
129
-
130
-
131
-
132
-
133
-
134
-
135
-
136
-
137
-
138
-
139
-
140
-
141
-
142
-
143
-
144
-
145
-
146
-
147
-
148
-
149
-
150
-
151
-
152
-
153
-
154
-
155
-
156
-
157
-
158
-
159
-
160
-
161
-
162
-
163
-
164
-
165
-
166
-
167
-
168
-
169
-
170
-
171
-
172
-
173
-
174
-
175
-
176
-
177
-
178
-
179
-
180
-
181
-
182
-
183
-
184
-
185
-
186
-
187
-
188
-
189
-
190
-
191
-
192
-
193
-
194
-
195
-
196
-
197
-
198
-
199
-
200
-
201
-
202
-
203
-
204
-
205
-
206
-
207
-
208
-
209
-
210
-
211
-
212
-
213
-
214
-
215
-
216
-
217
-
218
-
219
-
220
-
221
-
222
-
223
-
224
-
225
-
226
-
227
-
228
-
229
-
230
-
231
-
232
-
233
-
234
-
235
-
236
-
237
-
238
-
239
-
240
-
241
-
242
-
243
-
244
-
245
-
246
-
247
-
248
-
249
-
250
-
251
-
252
-
253
-
254
 |
 |
