Brother International PT-9500PC Quick Setup Guide - English and Spanish - Page 90
Select Print Options., Mirror Printing
 |
UPC - 012502607267
View all Brother International PT-9500PC manuals
Add to My Manuals
Save this manual to your list of manuals |
Page 90 highlights
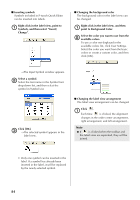
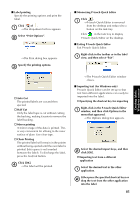
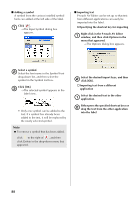
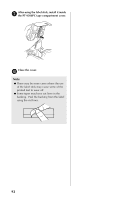
■ Using the text history Ten of the most recently printed texts are automatically stored for future use. By selecting from the text history list, previously used text can easily be added to the label. Click . 1 →The text history list appears. Select the text that you want to use. 2 ■ Printing the label Specify the printing options, and then print the label. Click to the right of . 1 →A drop-down menu appears. Select "Print Options". 2 →The selected text appears in the label view. →The Print dialog box appears. Specify the printing options. 3 Creating labels: Windows version " Auto Cut Select this option to automatically feed out and cut off the label after it is printed. Note ● When printing multiple copies of AV labels with the Auto Cut check box selected, each label is cut off after it is printed. If the Auto Cut check box is cleared, the string of labels are cut off only after they have all been printed. " Half Cut Select this option to cut only the label tape without cutting the backing, making it easier to remove the label backing. " Mirror Printing Select this option to print a mirror image of the data so that the label can be affixed to a window and read from the opposite side. For best results, use clear tape when this option is selected. 89
-
 1
1 -
2
-
3
-
4
-
5
-
6
-
7
-
8
-
9
-
10
-
11
-
12
-
13
-
14
-
15
-
16
-
17
-
18
-
19
-
20
-
21
-
22
-
23
-
24
-
25
-
26
-
27
-
28
-
29
-
30
-
31
-
32
-
33
-
34
-
35
-
36
-
37
-
38
-
39
-
40
-
41
-
42
-
43
-
44
-
45
-
46
-
47
-
48
-
49
-
50
-
51
-
52
-
53
-
54
-
55
-
56
-
57
-
58
-
59
-
60
-
61
-
62
-
63
-
64
-
65
-
66
-
67
-
68
-
69
-
70
-
71
-
72
-
73
-
74
-
75
-
76
-
77
-
78
-
79
-
80
-
81
-
82
-
83
-
84
-
 85
85 -
 86
86 -
 87
87 -
 88
88 -
 89
89 -
 90
90 -
 91
91 -
 92
92 -
 93
93 -
 94
94 -
 95
95 -
96
-
97
-
98
-
99
-
100
-
101
-
102
-
103
-
104
-
105
-
106
-
107
-
108
-
109
-
110
-
111
-
112
-
113
-
114
-
115
-
116
-
117
-
118
-
119
-
120
-
121
-
122
-
123
-
124
-
125
-
126
-
127
-
128
-
129
-
130
-
131
-
132
-
133
-
134
-
135
-
136
-
137
-
138
-
139
-
140
-
141
-
142
-
143
-
144
-
145
-
146
-
147
-
148
-
149
-
150
-
151
-
152
-
153
-
154
-
155
-
156
-
157
-
158
-
159
-
160
-
161
-
162
-
163
-
164
-
165
-
166
-
167
-
168
-
169
-
170
-
171
-
172
-
173
-
174
-
175
-
176
-
177
-
178
-
179
-
180
-
181
-
182
-
183
-
184
-
185
-
186
-
187
-
188
-
189
-
190
-
191
-
192
-
193
-
194
-
195
-
196
-
197
-
198
-
199
-
200
-
201
-
202
-
203
-
204
-
205
-
206
-
207
-
208
-
209
-
210
-
211
-
212
-
213
-
214
-
215
-
216
-
217
-
218
-
219
-
220
-
221
-
222
-
223
-
224
-
225
-
226
-
227
-
228
-
229
-
230
-
231
-
232
-
233
-
234
-
235
-
236
-
237
-
238
-
239
-
240
-
241
-
242
-
243
-
244
-
245
-
246
-
247
-
248
-
249
-
250
-
251
-
252
-
253
-
254
 |
 |
