Brother International QL-700 Software Users Manual - English - Page 40
Printing from other applications, Choose Brother QL-XXX. - printer driver
 |
View all Brother International QL-700 manuals
Add to My Manuals
Save this manual to your list of manuals |
Page 40 highlights
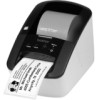
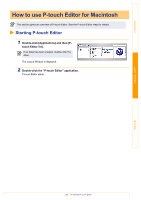
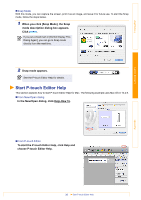
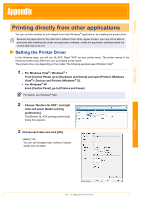
Introduction Creating Labels Printing from other applications We will use Microsoft® Word as an example. In the following steps, you will see QL-XXX. Read "XXX" as your printer name. The printer names in the following screens may differ from your purchased printer name. The screens may vary depending on the model. 1 Click and . The [Print] dialog box appears. 2 Choose "Brother QL-XXX". You can change the settings of the Printer Driver from the [Properties] dialog box which can be displayed by clicking . 3 Click to close the [Print] dialog box. 4 When you click [Page Layout], the ribbon appears. Then click the mark to the right of Page Setup. The [Page Setup] dialog box appears. 5 Click the [Paper] tab, and choose the paper size that you want to print. You can also choose the Label Format that you have added in Î Page 37. You can also set the page margins in the [Margins] tab. Appendix 6 Click to return to your document. The size of the Microsoft® Word window is adjusted to the paper size that you have just chosen. Edit the document as needed. 7 Click and , then click The specified labels are printed. . 39 Printing from other applications
-
 1
1 -
2
-
3
-
4
-
5
-
6
-
7
-
8
-
9
-
10
-
11
-
12
-
13
-
14
-
15
-
16
-
17
-
18
-
19
-
20
-
21
-
22
-
23
-
24
-
25
-
26
-
27
-
28
-
29
-
30
-
31
-
32
-
33
-
34
-
 35
35 -
 36
36 -
 37
37 -
 38
38 -
 39
39 -
 40
40
 |
 |