Canon DP-V3120 Video Display Operation Guide - Page 9
Adjust image quality on left/right side of screen (image comparison mode)
 |
View all Canon DP-V3120 manuals
Add to My Manuals
Save this manual to your list of manuals |
Page 9 highlights
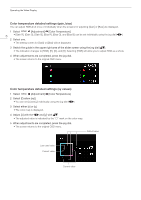
Operating the Video Display Adjust image quality on left/right side of screen (image comparison mode) You can divide the screen in two and adjust the image quality on the left and right sides of the screen individually. 1 Select [Channel Settings] [Picture Mode] [Type]. • Select [L/R]. 9 2 Select the screen to adjust image quality. • When the OSD menu is opened: -- Press the in the jog dial when the [Adjustment] main menu is selected. -- Press the CH1 button when the [Adjustment] main menu or sub menu is selected. • When the OSD menu is closed: Switch using the jog dial ( ). • Each time the target screen is switched, the set [Picture Mode] is displayed at the top. 3 Adjust the image quality on the selected screen. Note • When in Image Comparison mode, an icon showing which screen (L/R) is selected for image quality Adjustment, is displayed at the right top of the [Adjustment] menu screen. • The functions that cannot be used when the right screen is selected are as follows: -- Sub Menu items for [Adjustment]: [Contrast], [Backlight Control], [HDR/SDR View], [Calibration]*1, [Peak Luminance Control]*2, [Boost Contrast]*3 *1 *2 *3 • When two screens are displayed, you can adjust the image quality on each screen individually and compare them. -- When two screens are displaying the same image ([Single Input Dual View] 52) -- When two screens are displaying different images ([Multi View (Dual)] 49) -- You can check HDR (High Dynamic Range) display and SDR (Standard Dynamic Range) display side-by-side. ([HDR/SDR View] 37) Changing the screen display area When a video signal of 4096x2160 is input, the left and right parts will be trimmed for display. 1 Select [Display Settings] [Screen Scaling]. • Select [Native Input Resolution] or [200%]. 2 Press the jog dial ( ) while the OSD menu is closed. • Shifts to the left or right.
-
 1
1 -
2
-
3
-
 4
4 -
 5
5 -
 6
6 -
 7
7 -
 8
8 -
 9
9 -
 10
10 -
 11
11 -
 12
12 -
 13
13 -
 14
14 -
15
-
16
-
17
-
18
-
19
-
20
-
21
-
22
-
23
-
24
-
25
-
26
-
27
-
28
-
29
-
30
-
31
-
32
-
33
-
34
-
35
-
36
-
37
-
38
-
39
-
40
-
41
-
42
-
43
-
44
-
45
-
46
-
47
-
48
-
49
-
50
-
51
-
52
-
53
-
54
-
55
-
56
-
57
-
58
-
59
-
60
-
61
-
62
-
63
-
64
-
65
-
66
-
67
-
68
-
69
-
70
-
71
-
72
-
73
-
74
-
75
-
76
-
77
-
78
-
79
-
80
-
81
-
82
-
83
-
84
-
85
-
86
-
87
-
88
-
89
-
90
-
91
-
92
-
93
-
94
-
95
-
96
-
97
-
98
-
99
-
100
-
101
-
102
-
103
-
104
-
105
-
106
-
107
-
108
-
109
-
110
-
111
-
112
-
113
-
114
-
115
-
116
-
117
-
118
-
119
-
120
-
121
-
122
-
123
-
124
-
125
-
126
-
127
 |
 |
