Canon FS-4 User Guide
Canon FS-4 - FOCUS FireStore Pro Manual
 |
View all Canon FS-4 manuals
Add to My Manuals
Save this manual to your list of manuals |
Canon FS-4 manual content summary:
- Canon FS-4 | User Guide - Page 1
FS-4/FS-4Pro Portable DTE Recorder Release 1.0 User Guide Part Number: MANL-0954-01 - Canon FS-4 | User Guide - Page 2
be responsible for unauthorized use of equipment and will not make allowance or credit for unauthorized use or access. Contacting FOCUS ENHANCEMENTS: Email: [email protected] Telephone: 408-370-9963 8AM - Noon and 1PM - 5PM (PST), Monday to Friday (Hint: Mondays tend to be the busiest - Canon FS-4 | User Guide - Page 3
the FS-4 (Windows 25 Mounting the FS-4 (Macintosh 26 Dismounting the FS-4 (Macintosh 27 Transferring Clips to Your NLE System 27 Charging the Battery 27 Battery Use Warnings 27 Mounting to a Camcorder 27 Belt Mounting 28 FireStore Functions 28 General Screen Information 29 Record Screen - Canon FS-4 | User Guide - Page 4
Technical Specifications 55 Physical Description 55 Input/Outputs 55 Power 55 Audio/Video/Timecode Specification 55 DTE File Formats 55 Disk Information 55 Log Files 56 Error Messages 56 Warranty 56 Temperature 57 Compatible Camcorders 57 Optional Accessories 57 Table of Contents - Canon FS-4 | User Guide - Page 5
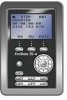
tape. • Compact, Lightweight, Rugged Design - The FireStore FS-4 weighs less than one pound including the battery and is only 1.5" thick. You can mount the FS-4 directly to your camcorder using 1. In this manual, when the FS-4 is indicated, it means FS-4 and FS-4Pro unless specifically indicated. 1 - Canon FS-4 | User Guide - Page 6
40GB (about 3 hours) hard drive. Extend record times by linking two FS-4 units together. Power the FS-4 using slim, removable battery packs or power it using the supplied AC adapter. • Easy to Use, Control and Update - The FS-4 interfaces with your camcorder using a single FireWire cable that passes - Canon FS-4 | User Guide - Page 7
and Removing the Battery Pack • Connect the FS-4 to AC Power • Connect the FS-4 to a DV Camcorder • Recording and Playback with the FS-4 • Power "On" the FS-4 • Set the Time and Date • Select a DV File Format • Recording With FS-4 • Manual Recording • Syncro Slave Recording • Playback on the - Canon FS-4 | User Guide - Page 8
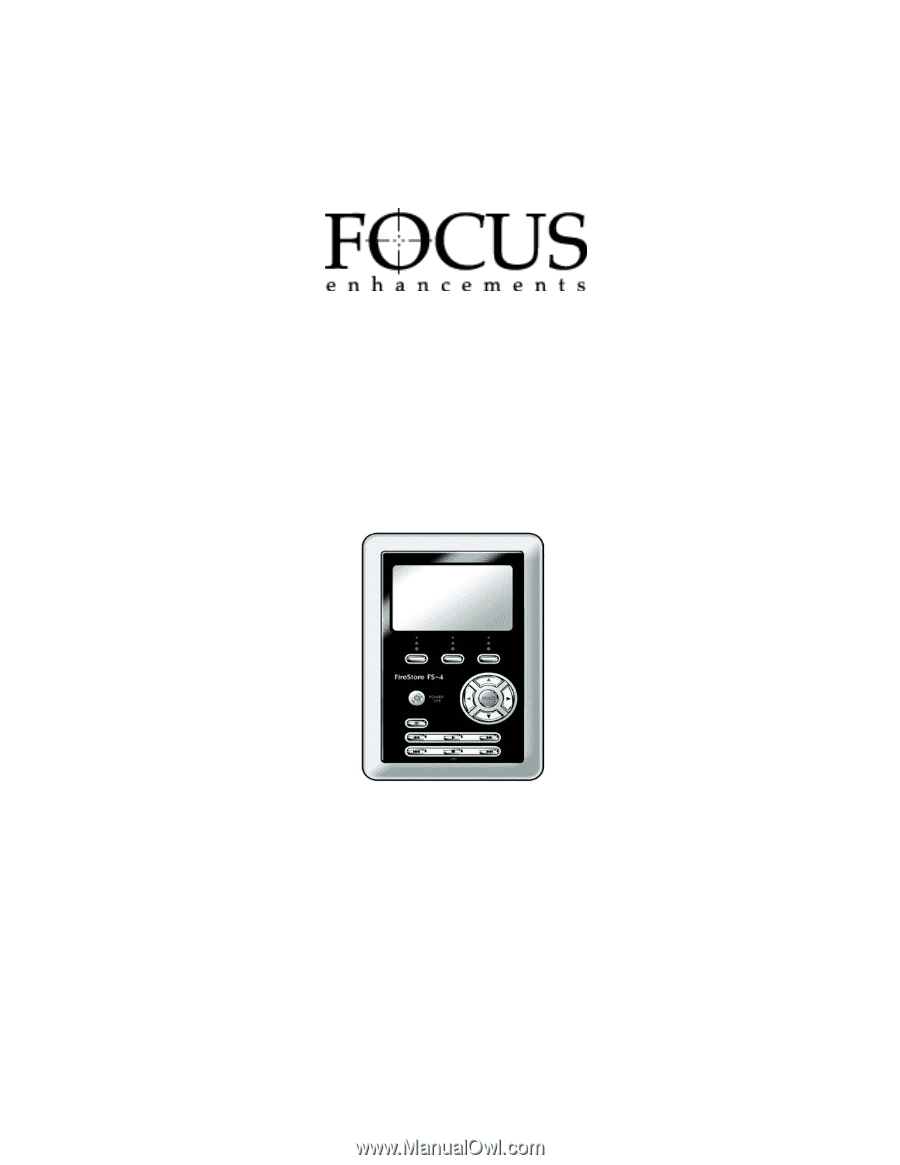
Physical Description and Basic Controls Front Panel Controls The front panel of the FS-4 is illustrated below. Power On Record Button Screen Function Keys Navigation Keys Transport Control Keys Speaker Screen This is a 14 character by 7 line dot matrix, backlit, LCD display. Function Keys - Canon FS-4 | User Guide - Page 9
operate these transport keys while on the HOME Screen. Top Row: Record Key z Press this key once when the FS-4 is in STOP mode to put the FS-4 into REC-PAUSE. Press it again to start recording. If you press the REC button during a recording, the current clip is closed and a new clip is created - Canon FS-4 | User Guide - Page 10
beginning of the current clip when in playback mode. Press this button twice in sequence to return the FS4 to the previous clip during playback. In STOP mode, press this key to return the FS-4 to the beginning of the previous clip. Stop Key „ While in the Home Screen, and in any - Canon FS-4 | User Guide - Page 11
control) Camera Firewire Connector battery error • Yellow Blink Charger voltage insufficient States of Status LED • Off Power Off Mode • Green Power On Mode - On, but no activity. • Yellow Playback (Blinks when the Hard drive is being accessed. • Red Record Mode • Blinking Red Record - Canon FS-4 | User Guide - Page 12
as a simple contact closure or RS232C port. You can also connect an optional wired remote commander. Camera FireWire Connector • DV Video I/O • 6-pin IEEE-1394a connector • Isochronous 25Mb/s DV video I/O Clip Post Fan Intake Vent (Do Not Block!) Battery Compartment Latch Battery Compartment 8 - Canon FS-4 | User Guide - Page 13
Side Panel The side panel contains cooling vents as illustrated below. Cooling Vents (Do Not Block!) Bottom Panel The FS-4 bottom panel features a single 2-pin DC power connector. Connect the supplied AC power adapter here. Cooling Vents (Do Not Block!) 9 - Canon FS-4 | User Guide - Page 14
"FireStore FS-4Pro provides Pinnacle AVI and Avid OMF. HDD Mode Screen - contains the following selections: DV Recorder, DD Drive, and Use Ext. FS-4. Record Screen - contains the following selections: Normal Record and Retro Cache Record. The FS-4Pro also contains Retro Disk Record and Loop Record - Canon FS-4 | User Guide - Page 15
the FS-4 with the battery. The Charge LED on the top of the FS-4 lights to show the battery is charging. A flat battery on charge will take 2-3 hours to charge with the unit powered off. The included battery will supply power to the FS-4 for about 90 minutes while in continuous Record or Playback - Canon FS-4 | User Guide - Page 16
models only). Plug the line cord or AC adapter into an electric outlet. Connect the FS-4 to a DV Camcorder Before performing this procedure, make sure you have performed "Installing and Removing the Battery Pack" on page 11 and/or "Connect the FS-4 to AC Power" on page 12. Step 1: Connect the - Canon FS-4 | User Guide - Page 17
you must prepare it by performing the following procedures: • Power "On" the FS-4 • Set the Time and Date • Select a DV File Format • Recording With FS-4 • Manual Recording • Syncro Slave Recording • Playback on the FS-4 The values you select with these procedures will remain the same during power - Canon FS-4 | User Guide - Page 18
unit initializes. You are ready to proceed when the Home screen (shown below) appears. Set the Time and Date After you have powered on the FS-4, set the time and date as follows: Step 1: Press the Right navigation key several times until the Setup Screen appears on the screen as shown - Canon FS-4 | User Guide - Page 19
Step 3: Step 4: Step 5: Use the Up and Down navigation keys to change the highlighted value. Use the Right and Left navigation keys to highlight the Month, Day, and Year. When complete, press the right-most Function Key indicated as BACK on the screen. The new date will be indicated on the Setup - Canon FS-4 | User Guide - Page 20
activities: • Manual Recording • Syncro Slave Recording or Tapeless Recording In all cases, make sure that you have set the time and date, set the recording format as explained above and connected the FS-4 to your video camera as explained in "Connect the FS-4 to a DV Camcorder" on page - Canon FS-4 | User Guide - Page 21
Manual Recording Before recording, make sure both the video camera and the FS-4 are powered on and connected with the FireWire cable. Step 1: Step 2: Set your video camera to "Camera" or "Cam" mode. Make sure you can see an image through the viewfinder. On the FS-4, press the Record key. This - Canon FS-4 | User Guide - Page 22
. Step 4: You can now use the video camera record controls and the FS-4 will respond to these controls. The recording signal goes both to the tape in the camera and to the FS4. NOTE: By selecting EXT TC in the Setup menu, you can record the camcorder's Timecode in the file. NOTE: You can also - Canon FS-4 | User Guide - Page 23
as required. Refer to "Quickstart" on page 3 for more information on the function of these keys. Using the FS-4 with a Computer Once you have recorded FS-4 clips to a FireWire disk drive using FireStore, you can use those clips in most computer based DV NLE systems. Traditionally, in order to get - Canon FS-4 | User Guide - Page 24
onto your computer system. Use the MODE screen to go into HDD mode. This step is required before mounting the FS-4 to your computer. Refer to the section, "HDD Mode Screen" on page 34 Connect the FS-4 to your computer system utilizing a standard 6-pin to 6-pin FireWire cable and connect power to the - Canon FS-4 | User Guide - Page 25
Mounting the FS-4 (Windows) Use this procedure for Windows XP, 2000, 98SE and ME. Step 1: On a Windows-based computer system, double click the My Computer icon on the top left hand corner of the desktop. You will see a window similar to the following: Step 2: Step 3: Locate the FS-4. It appears - Canon FS-4 | User Guide - Page 26
). The FAT32 file system is limited to a 2GB file size. This equates to roughly 9 minutes of recording time. When clips are being recorded to the FS-4 that exceed 9 minutes in length, the FS-4 automatically creates a new file without dropping any frames. The two clips have the same primary file name - Canon FS-4 | User Guide - Page 27
FS-4Pro only) The Avid DV OMF file format was developed for use with Avid editing products on Windows 2000, Windows XP or Mac 0SX. These products include Avid Xpress Pro DV OMF file, the FS-4 deletes the audio and video portions at the same time. In order to use the FS-4 recorded Avid DV OMF files - Canon FS-4 | User Guide - Page 28
DB or Desktop DF). NOTE: if you are using the ORGANIZE OMF function on the FS-4 prior to using the disk on a computer, step 2 and 3 are not necessary. A screen similar to the following appears: Step 6: Locate and select the FS-4 under Media Drive(s). NOTE: If the drive does not appear, check to - Canon FS-4 | User Guide - Page 29
the Media Tools Window into the bin. It is now possible to use these clips in the Avid timeline. Dismounting the FS-4 (Windows) Once you have completed working with the FS-4 on a Windows XP, Windows 2000, Windows 98SE or Windows ME computer system, you must dismount the drive before unplugging it - Canon FS-4 | User Guide - Page 30
Macintosh) Step 1: On a Macintosh, start your computer and connect your FS-4 to the computer utilizing a standard 6-pin to 6-pin FireWire cable. When mounted, your FS-4 should appear on the computer's desktop as shown below: Step 2: The FS-4 appears as a FAT32 volume with a PC label. This is not - Canon FS-4 | User Guide - Page 31
Battery The battery begins charging anytime it is connected to AC power using the AC adapter supplied with the FS-4. The charge LED lights when the FS Enhancements original battery chargers. Mounting to a Camcorder Mount the FS-4 to your camcorder using the optional Camcorder Mount Kit (P/N ASYF- - Canon FS-4 | User Guide - Page 32
mount to the belt clip post on the rear of the FS-4 and push it down to lock it in position. The belt clip can ratchet to various positions when attached to a belt. FireStore Functions FS screens: • "General Screen Information" on page 29 • "Record Screen" on page 31 • "HDD Mode Screen" on page - Canon FS-4 | User Guide - Page 33
the values, including the screen name. Values may be one time selectable, selectable among groups, or navigable to another screen as indicated by ">". The FS-4 screens are organized by function. Each screen contains a list of options. An option can be: - A setting that is inclusive of other options - Canon FS-4 | User Guide - Page 34
- FS-4Pro Only: Reel Display - In RECORD or PLAYBACK modes, this selection displays the particular REEL a clip is in or has been marked to, If in PLAY FROM -> REAL LIST mode, REEL appears in brackets for example, "". If no REEL has yet been selected, this area is blank. 7 - Battery - Canon FS-4 | User Guide - Page 35
is unselected. • When you make a selection, it is marked with a "- "to the left of the selection. • Once you select a particular mode in the Record menu, the FS-4 remains in that mode until you select a different mode. When you exit to the Home screen, the newly selected mode is active. The top - Canon FS-4 | User Guide - Page 36
DISK value of one minute if only one minute of disk space remains. • Once the RETRO DISK time is set, An "L" appears next to the record symbol on the FS-4's display and also in the camcorder's viewfinder. 32 - Canon FS-4 | User Guide - Page 37
• You can use RETRO DISK in LOCAL, and SLAVE RECORD control modes. Retro Cache Record Mode NOTE: You can only set RETRO CACHE in the FS-4Pro. On the FS4, it is either on (set by default to six seconds) or off. Step 1: Use the Right Navigation key to display the Retro CACHE screen. Step - Canon FS-4 | User Guide - Page 38
to twenty-four hours. The interval is the period of time between the FS-4 capture of a single frame of video (a value of 00:00:00:00 means no frames will be recorded). Step 1: Press the Right Navigation key from the Record Screen to display the TIME LAPSE screen. Step 2: Step 3: Step 4: Use the - Canon FS-4 | User Guide - Page 39
When you make this selection, the FS-4 functions as a DV Recorder, and expects I/O DV data from the camera FireWire connector. DD Drive When you make this selection, the FS-4 functions as a Volume, and mounts to a host computer using the computer FireWire connector. In this mode, you can also - Canon FS-4 | User Guide - Page 40
• AVI TYPE 2 24P/25P • PINNACLE AVI (FS-4Pro only) NOTE: When using AVID OMF or PINNACLE AVI formats, you must use the organize PINN or Organize OMF function in the Utilities Menu. Refer to the section, "Utilities Screen" on page 45. The latest DTE supported applications and what file formats to use - Canon FS-4 | User Guide - Page 41
• EXT CTL OFF; Group Default • EXT CTL PLAY • EXT CTL FRAME • EXT CTL FILE • TC EXT; Group Default • TC REC RUN • TC FREE RUN (FS-4Pro only) • TC REGEN (FS-4Pro only) • TC SET > • UB SET > FS-4Pro only • TC DROP - NTSC only. • TC NON-DROP; Group Default - - NTSC only. • LCD CONTRAST 37 - Canon FS-4 | User Guide - Page 42
DATE When you make this selection, the SET DATE screen appears for setting the date. Refer to the section, "Set the Time and Date" on page 14. TIME When you make this selection, the SET TIME screen appears for setting the time. Refer to the section, "Set the Time and Date" on page 14. VERSION When - Canon FS-4 | User Guide - Page 43
one minute. In LCDLIGHT AUTO mode: • Pressing any keypad key on the FS-4 turns the backlight back on (But will not carry out the function ". The alarm alerts you for conditions such as low battery charge, low disk space, or over heating of the FS-4, as well as the button feedback indicator. STOP ( - Canon FS-4 | User Guide - Page 44
The last number used is stored in the memory, so this mode persists across recording sessions. When you enable FREE INT mode, the FS-4 begins counting from the value stored. When you use the TC PRESET function, when the number is entered and the TC PRESET menu is exited, the FS-4 begins counting. 40 - Canon FS-4 | User Guide - Page 45
the camcorder Timecode mode to REC RUN, REGEN or EXT TC, the FS-4 will NOT record the timecode when recording to disk only. Use the FS-4 TC modes if you want any of these TC modes. TC SET (or TC / UB SET - FS-4PRO increment and decrement the value. The LCD contrast changes according the value. 41 - Canon FS-4 | User Guide - Page 46
menu. The default is listed first. MENU FA SYNC FA AV/C FA TAPELESS FA REEL1 Appears on LCD as... SYNC (Toggles between SYNCRO and NORMAL record control) (default) AV/C (Toggles between AV/C and NORMAL control) TAPE (Toggles between TAPELESS TRIGGER and NORMAL control) R1 (Marks Clip to Reel - Canon FS-4 | User Guide - Page 47
the file name) R1 (Marks Clip to Reel 1) FS-4Pro only R2 (Marks Clip to Reel 2) FS-4Pro only R3 (Marks Clip to Reel 3) FS-4Pro only R4 (Marks Clip to Reel 4) FS-4Pro only R5 (Marks Clip to Reel 5) FS-4Pro only R6 (Marks Clip to Reel 6) FS-4Pro only R7 (Marks Clip to Reel - Canon FS-4 | User Guide - Page 48
REEL10 FC BLANK R2 (Marks Clip to Reel 2) FS-4Pro only R3 (Marks Clip to Reel 3) FS-4Pro only R4 (Marks Clip to Reel 4) FS-4Pro only R5 (Marks Clip to Reel 5) FS-4Pro only R6 (Marks Clip to Reel 6) FS-4Pro only R7 (Marks Clip to Reel 7) FS-4Pro only R8 (Marks Clip to Reel - Canon FS-4 | User Guide - Page 49
CLIP > • FORMAT > • REPAIR DISK > • REPAIR CLIP > • FILE NAME > • UPGRADE > • SYSTEM RESET > • STATUS > ORGANIZE REEL (FS-4Pro Only) This selection places all file identified as a REEL clip during recording or playback into the appropriate reel folder. You can import this folder directly into most - Canon FS-4 | User Guide - Page 50
FS-4Pro Only) This selection organizes clips for use with Pinnacle Liquid series NLE systems. Products such as the Pinnacle AVI file format were created for use with products such as Pinnacle Liquid Edition. The Pinnacle AVI file format creates three files simultaneously during a recording the FS-4 - Canon FS-4 | User Guide - Page 51
FORMAT DISK FOCUS Enhancements recommends that the FS-4 is formatted after each recording to prevent lost frames due to fragmentation. NOTE: FORMATTING WILL ERASE ALL DATA ON DISK! Back up or transfer any files or clips on the FS-4 before selecting a format. This selection formats the disk as - Canon FS-4 | User Guide - Page 52
following screen appears. Step 3: Step 4: Select YES and the FS-4 begins repairing the disk and displays a status screen. Upon and Down navigation keys to increment and decrement the digit values. Select YES. The FS-4 begins repairing and displays a status screen. Upon complete or error, the screen - Canon FS-4 | User Guide - Page 53
and connect it to a computer. Step 2: On your computer, rename the XXX.bin file as follows: FS4.bin. Step 3: Copy the FS4.bin file to the FS-4 while it is in HDD mode. Step 4: Exit the FS-4 from HDD mode and navigate to the Utilities screen. Step 5: From the Utilities screen, use the Down - Canon FS-4 | User Guide - Page 54
power and thermal problems with your unit. REELS SCREEN (FS-4Pro only) When a disk is formatted, the FS-4 creates 10 folders numbered 0-9 on the disk. You can name these folders anything (up to 10 characters) when the FS-4 is mounted to a computer in DD mode. During recording or playback of - Canon FS-4 | User Guide - Page 55
characters When you use the optional wired remote control, use the keypad numbered 0-9 to directly mark clips. Any additional key presses during a recording or playback, changes the selected folder. Once a session is finished, select ORGANIZE REEL in the utilities folder where the clips are placed - Canon FS-4 | User Guide - Page 56
key. At the end of the particular clip, the FS-4 pauses. Play All In this mode, the FS-4 plays the entire contents of the disk (all clips) two choices: • TRACKLIST - clips are played back in the order in which they were recorded (based on the order of the file name). • REEL - clips in a selected - Canon FS-4 | User Guide - Page 57
DV NLE system that is not supported by Direct To Edit Technology. In these cases, the FS-4 can be used to capture footage to the NLE with the same behavior as a camcorder. NOTE: AV/C is NOT for use in FS-4 RECORD MODES. Syncro Slaved In SYNCRO SLAVED mode, a camcorder and the FS-4 share the same REC - Canon FS-4 | User Guide - Page 58
DSR-390, DSR-370, DSR-570, Canon XL1s and XL2 and the Panasonic DVX-100/-100A. FS-4 LCD Display Modes The table below shows the different symbols and states displayed on the top line of the LCD when used with different FS-4 control, record, play and stop modes: PLAY/REC MODE Stop Pause Play Rec ( - Canon FS-4 | User Guide - Page 59
DC, 7.5W Mini-jack power connector Custom Removable Li-ion Rechargeable Battery Pack (90 minutes estimated run-time) Audio/Video/Timecode Specification • 32kHz) Audio DTE File Formats • RawDV, AVI Type 1, AVI Type 2, Matrox AVI, Canopus AVI, QuickTime, AVI Type 2 24p, QuickTime 24p • FS-4Pro Only: - Canon FS-4 | User Guide - Page 60
AC Power or replace the battery pack. Make sure the vent and fan intake holes are clear. Transfer files off the drive and format it before attempting to do more recording. Contact FOCUS Enhancements Technical Support. Contact FOCUS Enhancements Technical Support. Warranty • 1 year FS-4 • 2 year FS - Canon FS-4 | User Guide - Page 61
: -20 to 60° C (-4° to 140°F) • Storage humidity: 85% RH or less Compatible Camcorders For a list of tested camcorders, refer to www.focusinfo.com. Optional Accessories For a complete list of optional accessories for the FS-4, visit the FOCUS Enhancements website at www.focusinfo.com. 57
-
 1
1 -
 2
2 -
 3
3 -
 4
4 -
 5
5 -
 6
6 -
 7
7 -
8
-
9
-
10
-
11
-
12
-
13
-
14
-
15
-
16
-
17
-
18
-
19
-
20
-
21
-
22
-
23
-
24
-
25
-
26
-
27
-
28
-
29
-
30
-
31
-
32
-
33
-
34
-
35
-
36
-
37
-
38
-
39
-
40
-
41
-
42
-
43
-
44
-
45
-
46
-
47
-
48
-
49
-
50
-
51
-
52
-
53
-
54
-
55
-
56
-
57
-
58
-
59
-
60
-
61
 |
 |
FS-4/FS-4Pro
Portable DTE
Recorder
Release 1.0
User Guide
Part Number: MANL-0954-01