Canon FS-4 User Guide - Page 19
Press the right-most Function Key indicated as BACK
 |
View all Canon FS-4 manuals
Add to My Manuals
Save this manual to your list of manuals |
Page 19 highlights
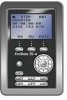
Step 3: Step 4: Step 5: Use the Up and Down navigation keys to change the highlighted value. Use the Right and Left navigation keys to highlight the Month, Day, and Year. When complete, press the right-most Function Key indicated as BACK on the screen. The new date will be indicated on the Setup Screen. Use the Down navigation key to select the time and press the Right navigation key. The following screen appears: Step 6: Use the Up and Down navigation keys to change the highlighted value. Use the Right and Left navigation keys to highlight the Hour, Minute, and Second. (Time is indicated in 24hr. mode.) Step 7: Press the right-most Function Key indicated as BACK on the screen. The new date will be indicated on the Setup Screen. The Time and Date are now set. Step 8: Press the Left Navigation key to return to the beginning screen. For more information on the Setup function, refer to the section, "Setup Screen" on page 37. 15
-
 1
1 -
2
-
3
-
4
-
5
-
6
-
7
-
8
-
9
-
10
-
11
-
12
-
13
-
 14
14 -
 15
15 -
 16
16 -
 17
17 -
 18
18 -
 19
19 -
 20
20 -
 21
21 -
 22
22 -
 23
23 -
 24
24 -
25
-
26
-
27
-
28
-
29
-
30
-
31
-
32
-
33
-
34
-
35
-
36
-
37
-
38
-
39
-
40
-
41
-
42
-
43
-
44
-
45
-
46
-
47
-
48
-
49
-
50
-
51
-
52
-
53
-
54
-
55
-
56
-
57
-
58
-
59
-
60
-
61
 |
 |
